As the pandemic is making the world more virtual, the popularity of WebRTC is increasing in a great speed. The usage of WebRTC has been increased by 100x in past one year, since March 2020. This is creating a huge demand for WebRTC developers but there are not many good developers as of today. Here the demand is outstripping supply by a good margin for last one year and the trend is going to continue as it is difficult to become a good WebRTC developer. Why? Because it is not very easy to grasp the totality of this technology and also developers fall in to the trap of common myths and loose interest in the mid way. Here we will try to describe the common myths and also burst them so that it will help aspiring developers come out of the trap.
Myth 1: WebRTC is p2p!
WebRTC is NOT only P2P, it is N2N, where N is any number of your choice!
Thinking WebRTC is p2p is like thinking only bicycles can be made using wheels!! We all know the reality. Wheels can be used starting from bicycles till airliners like AirBus A320 and all kind of transportation vehicles in between. The thing that one need to understand is the amount of complexity involved in developing a bicycle and a modern airliner are in two completely different levels. Almost all the times, aspiring developers get an example of how to build a bicycle aka a p2p WebRTC based video conferencing example and think that this is what they can make at best using wheels aka WebRTC. We don’t think any body in their wildest dream can think of getting an step by step example on how to build an modern airliner like Airbus A320. It is the same with WebRTC as well ! Here also you can’t expect to get a github repo which is google meet grade video conferencing application. It is simply not possible for anyone to put an effort to build things like Gmeet by investing millions of Dollars and the give it for free in github. What generous people can give is a bare bone heavy duty media server to build a video conferencing application on top it.
The task of building a production grade video conferencing app can primarily be divided in to 4 categories.
The frontend part where one will deal with the UX/UI along with audio/video streams, screen sharing, moderator settings etc
The backend part where one will deal with things like user authentication, real time connection management using some thing like websocket or a 3rd party service like pusher. this can be called as a combination of application + signalling server
The media server part where one handles the audio video streams and forwards them to other user based on the signalling server logic. The job of media server aka SFU is to forward the audio video streams to other users.
The devops part where one manages the application load based on the number of users join the room and the number of rooms getting created.
How to build a production grade video conferencing application is a learning in itself and there are no shortcuts available for the same without doing the hard work.
Myth 2: Free STUN server by Google is just enough!
People who have built their first p2p application by following a github repo or a youtube tutorial, most probably have used the free STUN server provided by google for learning purposes. They tend to use the same while building their commercial grade applications after a couple of months or years as well because they remember that it worked well when they built their first demo application. The free STUN server by google is like the first computer / laptop gifted by your parents while you were still a student. That was capable enough to run the all the programming languages you studied in your school or college. But that is not sufficient enough for you when you join your first job. There you get a new desktop / laptop which is suitable for a production grade working environment. Both the laptops / computer may run on similar kind of hardware or even software. So, what really changes is the percentage of dependability on the device you use for your work is more than the 1st device gifted by your parents. It is exactly same here. A production grade STUN aka TURN server is far more dependable than the free STUN server by google.
A STUN server is server which helps the peer connection in detecting the public IP address of any device which is needed for transporting the audio/video stream over the internet. A commercial STUN server( aka TURN server) is essential for a production grade application for minimising call drops. People interested in knowing the reason can drop me a mail at hello@centedge.io and we will be happy the reply back with the explanation on why it is needed.
Myth 3: TURN servers are really not needed, STUN is just enough!
Many time developers developing their 1st commercial grade video application complains about both parties not able to see each others video in certain random scenarios. They find it hard to find out why is it happening. Majority of the calls are just working fine but 10% (approx.) are not working fine! Majority of the times in such scenarios, the culprit is the network where both parties are simply not able connect directly through each others public IP address provided by the STUN server. This happens because a demon blocks the network while both of devices try to connect using each others public IP address. A DEMON ??!! Yes a DEMON and the name of the demon is Symmetric NAT. A symmetric NAT is a technique used by enterprise network admins to block all kind of inbound access to their internal devices in their LAN. When this happens the Public IP is not capable enough to connect to a device behind a Symmetric NAT. In this case, a TURN server comes to the rescue and becomes a broker between both the peers and relays the media from each other in a bi-directional manner.
According to statistics, out of 100 calls made using WebRTC, 10 -15% of the calls happen to relayed through a TURN server. Using a TURN server, one can decrease their call drop percentage. The other good news is that A STUN and TURN server come bundled as one package and one can deploy one server to serve both the purposes. COTURN is a open source STUN and TURN server which can be deployed at your own datacenter or on cloud.
Once it is deployed, one can check if the server is working as expected or not using this WEBRTC trickle ice test page. If one gets both the reflex and relay candidates in this page, then the server configuration will be considered to be proper.
These are 3 most common myths among aspiring WebRTC developers as experienced by us. There may be more to this list. We will try to modify this post by adding other popular myths as and when we encounter them.
If you aspire to become a full stack WebRTC developer with at least 2 years work experience in MERN stack, we would love if you join our developer network to stay updated with all the latest changes in WebRTC and related technologies as well as get WebRTC related consulting / job opportunities, if available. Here is the link to fill up the form to show your interest in joining our developer community. Once we get your request, we will get in touch with you for on-boarding you to our developer community.
If you have any queries related to your own WebRTC implementation, feel free to drop us a email at hello@centedge.io.
While watching a video by Belinda Goodrich, where she mentions that how a trip to India changed her life and shares three quotes with the audience while ending her talk.
The quotes are
Honour over Hustle
People over Profits
Service over Sales
All three quotes made me thinking as how can I make sense of all these quotes and how can I implement even one in my current work life. The first quote is what I try to implement when dealing with people and I realise the immediate benefits I get out those discussions/ conversations where I try to follow this. The second quote may not be highly relevant for us as of now as the product we are building is yet to become profitable. Whenever it becomes profitable in near future, it will be for the effort of the whole team and the team will be the cause of that profit but not vice-versa. Therefore I think it is justified to put the team first and profit later. The third quote is what made me think deeply that how we can embed the service component in to our upcoming sales process. This is a good time to do such a thing as we are in the starting phase of building our sales team from scratch and we are yet to hire our first sales engineer!
As an individual and team, I have built a couple of video conferencing applications from scratch for various use cases including video banking, video teaching learning, tele-health, video commerce etc. When I built my first video conferencing system way back in 2014, it was purely for fun. I built to have a video call with my friends without using Skype or Hangout, the 2 most popular video conferencing services of that time. After that I built an interview recording system for a College Professor and his PhD candidate for some research purposes. Afterwards, I built a couple of video conferencing and live streaming systems as proof of concepts for advanced use cases of those times using things like Kurento, OpenCV, face detection/ recognition, in video object detection for use cases like in video e-commerce etc.
It was in the year 2016, when I thought of doing something serious about this video thing and started building an ed-tech startup in order to help people teach and earn money online. It had all the components in it like live streaming, recording, hand raising, social learning, content sharing among different groups and sections of students etc. We built all this in 6 -12 months of time. It was around early 2017, when we released our 1st version for public use and got some good as well as bad feedback. The response was not that great especially in Indian market due to 2 -3 primary reasons. The data cost per GB was way too high( INR 250,$3.5/GB on 3g speeds), 4G speed was not there which is good for video calls and unavailability of suitable consumer hardware devices with teachers to teach online. After trying out for couple of months, we went to colleges to check if they will be willing to buy our platform as a subscription to promote anytime anywhere teaching learning. We specifically told the colleges that this will enhance your existing teaching learning experience and prepare you for a future where online teaching will be a common thing(which is the case now!). The colleges told us that such a future is at least a decade away from that time i.e. from 2017. It was not that great of a success trying to sell our platform as a SaaS. Then we asked them if they can let us know what they wanted to buy to which they said that they wanted to buy an ERP. We decided to give it a try to check if we can integrate an ERP into it, which took us a good amount of time. Though it was not making sense to us at that point of time, we decided to go with customer demand. When we took our new thing to them , they said that they only want an ERP but not online teaching learning thing. If we wish to give them for free, then they may try to use it. All the video tech guys out there know it very well that except companies like Microsoft and Google with huge war chests, tiny tots like us won’t be able to provide free video conferencing / live streaming services to colleges with the resources the services demand to run efficiently. Finally, we had to shut things down at March 2019 as things were not going as expected and we were still some distance away from break-even.
When I look back today, I ask this question to myself that what I would have been done differently at that time so that the result would have been different today? I was not able to find any answer to this question until March 2020. But from April 2020, all things started to become more and more clear. Now I know a definitive answer(almost!) to this question and the answer is if I would have been chosen a Service over Sales route, there would have been a different outcome. There were guys at that time as well, who were having troubles teaching offline but they were fantastic guys in what they taught. They were ready to try us out and ready to cover our bare minimum costs. But we didn’t like them at that time because they didn’t meet the textbook definition of how a typical customer of a SaaS product should look like. We didn’t give much importance to them rather than chasing our typical customers and we came to the conclusion which we got at March 2019. If we would have chosen to give our wholehearted focus on satisfying those who were interested in taking our product as a Service to them, the result would have been different today!
May be that’s why there is a saying that experience comes from not so good decisions!
With that experience, as we are going to launch a product again soon, we are dedicated this time to do the Sales as a Service. To begin with, we have decided to offer our whole platform along with all the features including the cutting edge once to a chosen few purely as a Service without any kind of Profit for us for a time period of 12 -24 months. We are going to provide our complete platform to a selected few Not for Profit organisations. Why only to provide to not for profit organisations because we will also be working on a non-profit basis from our side.
Here is what we are going to provide.
Our complete platform on an independent subdomain of your choice as a dedicated service
Future upgrades and enhancements
Customer support and trouble shooting support
Bug fixing if any
Here is who you should be.
You should be a not for profit organisation from any part of the world.
You should be either from edu-tech, fin-tech, insure-tech, surveillance-tech or health-tech domain.
You should have an existing product or service in the market for at least 2-3 years serving your end users.
You should have a need in existing product or service where video can enhance the success of your product / service, either significantly or marginally.
You should be willing to pay for your cloud bills. In case we get enough credits from our cloud partner, we can try to cover some part of this as well but we can’t assure you that it will happen. It may happen or mayn’t happen as well.
Last but not the least, we need a small commitment fee(in 1$$$) only once. We need this in order to confirm that you are committed to integrate video our rooms in order to enhance your own value proposition and you are not in the experimental stage of your own offering where you are not sure that video can enhance your own value proposition or not.
If you are looking for building a video conferencing app either for video banking, video insurance, video surveillance,video education or video health, do let us know. We will be super happy to help you build your own app or enhance your existing one to make it better. There is also another great option to adopt our service as a managed service for your own use case and build on top of it.
Here is the link to our latest video rooms:- Magic rooms
We are reachable on email at hello@centedge.io. You also can chat with us using the chat widget on this website. We typically respond within 5 minutes or sooner for chat and 1 day (max.) for email . You can schedule a free 30 mins call with one of our senior consultants using this link for resolving your doubts/ concerns not only about our services but also about how your existing services using WebRTC for video conferencing or live streaming can be improved. Here is our LinkedIn page to stay connected.
Here is the Link to the video from which I got the inspiration.
Building a WebRTC powered videoconferencing app is really cool and one can use it for multiple purposes including showing off to friends! The real challenge lies in understanding the complexities involved in WebRTC and then successfully dealing with it to build an app. Though it is not necessary to understand all the complexities from the beginning to build the app and one can gradually learn the concepts as one progresses with usage of WebRTC. While working with WebRTC for a couple of years now, we thought of coming up with something to help others build cutting edge video conferencing apps from scratch within an hour. We finally were able to build a npm module a couple of days ago for that same purpose. This blog post is going to provide a practical walk through on how to use that npm module to build a cutting edge video conferencing app from scratch Or integrate it to an existing app within an hour.
The npm module is a pre-baked reactjs ui component consisting of 2 pages, one for pre-call audio / video check and another for the video conferencing room itself. As it is a react component, one can easily integrate it to any existing react project to enable the app with cutting edge video conferencing capabilities. We are going to create a simple react app from scratch using create-react-app for the sake of simplicity and ease of implementation. But feel free to use the same code as mentioned below to use it in a more complex, existing react project. In order to follow this post, one needs a basic understanding of JavaScript and Reactjs. Lets begin!
If you are somebody who likes to do a git clone first and then go through this post, then here is the github linkfor you to download the source code and run it in your local system.
Before beginning, do keep in mind that you DON’T need a Credit card OR an API key/secret combo OR even a Signup at Centedge to run this app. You simply need to follow this tutorial and build your app. No strings attached !!
Before starting to build our app, we need to have node and npm install in our computer to follow through this post. If you don’t have those installed yet, please visit this link to download and install nodejs and npm for your OS. If you are on a Linux flavour like Ubuntu, then visit this link.
Once you have node and npm installed on your system, you are ready to create the app. Use this to create a new react app.
mkdir react-demo
cd react-demo
npx create-react-app <name-of-your-app> //Ex. react-videoconf-demo
The above commands will create a folder called react-demo in the current directory and create a sample react app named react-videoconf-demo (if you have chosen the example app name as your app name) inside that folder. You can run the default app to view it in the browser by following the steps mentioned in the output of the above mentioned command or by following these mentioned below.
cd <name-of-your-app>
npm start
After this you should see the below output in your browser, if everything is fine until now. If you are not getting this output or you are facing some issue starting the sample application, you may not have installed node and npm properly! Please reinstall them and start from scratch again by following the above mentioned steps. If you got this output, please proceed ahead.
The sample react app project structure should look like as mentioned below. You may not have the yarn.lock file if you are using npm. Instead you will have package-lock.json and this is okay.
Now we are ready to make changes to our sample app and start integrating the necessary components to build our cutting-edge video conferencing app.
The default app.js file looks like as shown below which we are going to change soon.
Now replace everything from this file with the code mentioned below.
import React from 'react';
import { BrowserRouter, Route, Switch } from "react-router-dom";
import AdminComponent from './components/AdminComponent';
import UserComponent from './components/UserComponent';
import LandingComponent from './components/LandingComponent';
import './App.css';

function App() {

 return (
 <BrowserRouter>
 <div className="App">

 <Switch>
 <Route path="/" component={LandingComponent} exact />
 <Route path="/admin" component={AdminComponent} exact />
 <Route path="/user" component={UserComponent} exact />
 </Switch>

 </div>
 </BrowserRouter>
  );
}

export default App;
This is what we are trying to achieve with the above code block.
Using react-router to load 3 separate components named Landing, admin and user using 3 separate URLs
All the components are defined in a folder named components inside src from which we are importing them to use in the App component.
We are importing the default css file to load some styles.
The next lines are the syntax to load those 3 different components in 3 separate unique URLs including 1 default landing URL.
You also need to install the react router npm package named react-router-dom to run the app. You can install the same using the below one liner.
npm install react-router-dom
Below are the individual components imported in the app.js file.
LandingComponent.jsx
import React from 'react';
import { useHistory } from "react-router-dom";

 const LandingComponent = () =>{
 const history = useHistory();
 return(
 <div>
 <h1>Hello, My App!</h1>
 <button onClick={()=>{history.push('/admin')}}>Join as Admin</button>
 <button onClick={()=>{history.push('/user')}}>Join as User</button>

 </div>

     )
 }
export default LandingComponent;
Now, the folder structure should look like as below.
If you have followed the tutorial correctly until now, you should get the below output in the landing page when you run the app.
The URL is http://localhost:3000/
This is what you will get when you click the ” Join as Admin” button.
The URL is now changed to http://localhost:3000/admin
This is what you will get when you click the ” Join as User” button.
The URL is now changed to http://localhost:3000/user
If you haven’t got the above mentioned output in your app, please recheck the previous steps. You may have missed something important! If you got the desired output, you are ready to proceed.
Now that the skeleton is ready for building our video conferencing app, we need to install the necessary packages to make it happen. The most important package to make it happen is named cvr-rui. You need to download this package using the below mentioned command.
npm install cvr-rui
One it is installed, replace the content of AdminComponent with the below code.
import React from 'react';
import ParticipantPage from 'cvr-rui';

 const AdminComponent = () =>{
 const callEnded = () =>{
 console.log('hey, the call has been ended!!');

    }
 const callStarted = () =>{
 console.log('hey, the call has been started!!');

    }
 const webVideoConfig = {
 theme:'light',
 joinButtonColor:'secondary',
 roomName:'my-1st-video-room',
 userName:'admin-user',
 participantType:'moderator',
 adminApprovalRequiredToJoinRoom:false,
 screenSharing:true,
 chatOption:true,
 callStartFunction:callStarted,
 callEndFunction:callEnded,
      }

 return(
 <div>
 <ParticipantPage config={webVideoConfig} />
 </div>

     )
 }
export default AdminComponent;
Also replace the UserComponent code with the below code.
import React from 'react';
import ParticipantPage from 'cvr-rui';

 const UserComponent = () =>{
 const callEnded = () =>{
 console.log('hey, the call has been ended!!');
    }
 const callStarted = () =>{
 console.log('hey, the call has been started!!');
    }
 const webVideoConfig = {
 theme:'dark',
 joinButtonColor:'primary',
 roomName:'my-1st-video-room',
 userName:'regular-user',
 participantType:'',
 screenSharing:true,
 chatOption:true,
 callStartFunction:callStarted,
 callEndFunction:callEnded,
      }


 return(
 <div>
 <ParticipantPage config={webVideoConfig} />
 </div>

     )
 }
export default UserComponent;
If you have followed the post properly until now,you will get a result as below when you try to load the AdminComponent by clicking on the Join as Admin button in your landing page
and the UserComponent by clicking on the the Join as User button in your landing page.
Now is the time to click the join room button in both the pages. Once you click the Join Room buttons, the magic happens as shown below.
When only admin user joined the room
when regular user also joined the room
Admin view after regular user joined the room
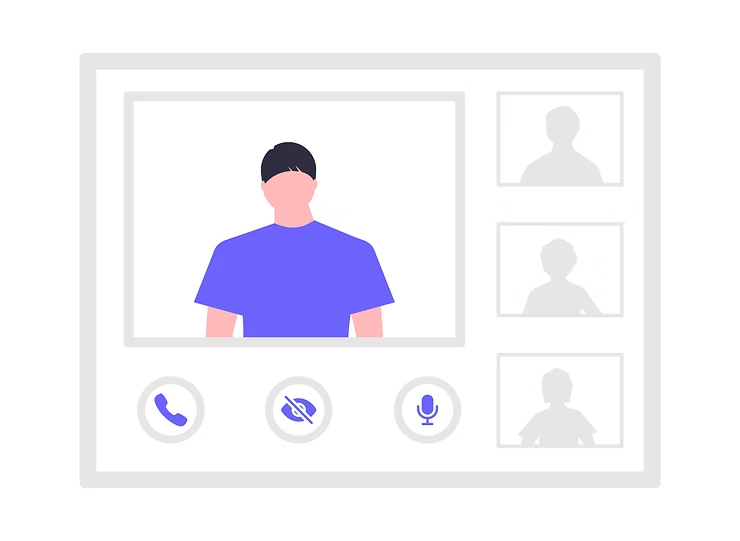
Now we have successfully created a cutting edge video conferencing app with active speaker detection and real time bandwidth monitoring and display enabled by default.
You can also easily integrate it into any existing react project to enable it with cutting edge video conferencing capabilities. Please feel free to drop us an email at hello@centedge.io in case of any issue while trying to follow this post or in case of a bug in the npm package.
The link to the Centedge app running a very similar UI is here.
Note
This react ui is running with the help of a small scale video back-end infrastructure sponsored by Centedge along with some generosity from AWS. That’s why you don’t need a Credit card OR an API key / secret combo OR even a Signup at Centedge to run this app! As this is a small scale setup, we don’t advise anybody to build production grade video applications using this npm package which internally depends on infrastructure from Centedge. The back-end setup currently can handle 6 participants in one room including moderator and can handle 5 such rooms simultaneously! Please feel free to play around and tinker around using this package. If you want to build something serious using this and need more number of rooms or more number of participants in each room, feel free to drop us an email at hello@centedge.ioand we will be happy to create a production grade infrastructure setup for you.
We are super excited to inform that next generation of Centedge Video Rooms(CVR) is now live. Though this has been a minor release( v2.1), it has many important features like auto re-connection in case of a network outage at the user end, availability of detailed call logs for the meeting host in his / her dashboard and efficient video bandwidth optimisation to name a few. Apart from these important features, overall stability and usability of the video rooms have been improved greatly.
In this post, we are going to discuss the top 3 important improvements of this minor release and why we consider them important.
Network outage resiliency and Auto re-connection
In a private forum while discussing with some global experts in the WebRTC and Audio Video domain, our founder came to know that network condition in a country like India is not comparatively good like other developed countries with frequent to very frequent network outages during ongoing meetings. He also got a similar feedback from our regular users that many time the users need to rejoin a meeting due to network outage. Though the network outage only happens in the range of 2 – 30 seconds, the users audio video freezes inside the meeting. Then the user has to leave and rejoin the meeting in order to resume conversation.
A participant leaving and rejoining the meeting usually breaks the flow of the conversation while a meeting is going on and usually a recap is needed once the user rejoins the meeting. If each participant rejoin extends the meeting time by 5 -10 mins and if there are 2-3 rejoins happen in each meeting, then the meeting time is getting extended by 10 – 30 mins overall. In case a user joins 5 such meetings a day and 15 mins of additional meeting time needed for rejoin recap (which could have been avoided!) in every meeting, a total 75 mins(15% – 20%) is wasted in a 6-8 hours work day.
This made us implement the auto reconnect feature with a sense of urgency. Once implemented, it not only detects the network changes in the mobile devices(WiFi to LTE and vice versa), but also complete network outages like switching off the wifi / pulling out the Ethernet cable in the desktop computers. Once it detects a network outage, it informs all others in the meeting about a possible network outage of a participant and patiently waits for the network to comeback in the participants side. Once the network is back, it effortlessly auto reconnects the participant to the meeting and informs all others in the meeting that the participant is now back again.
The best way to test this feature for yourself is to join the demo room with a friend, switch off your wifi / pull out the Ethernet cable after a minute or 2 into the meeting, wait for 10 -30 seconds so that network will be completely dead and then switch on your wifi / reconnect your Ethernet cable to see if it can effortlessly reconnect you to the meeting again. Keep in mind that if you are not reconnecting your cable / switching on your wifi for 5 minutes, then the user will be considered permanently disconnected, no further re-connection attempt will be made and garbage collector will mark the participant as stale ready for garbage collection. The participant needs to rejoin the meeting anytime after 5 mins once his/ her network is back. The link to the demo room is here.
Detailed Call logs in the dashboard
A very important thing for the room owner is to know the detailed of past conversations that have happened. We consider details like start and end time, number of participants joined, total conversation time etc. are important for the room owner. Apart from this, there are a host of other information about each individual participant which may be of interest to the room owner. Individual participant details like name, room join time, room leave time, browser from which the participant has joined, the browser version, the operating system and network outage status. This will help the room owner understand more things about the participants in case the room is being used for small events or training sessions. A detailed rating and feedback system is in active consideration as an extension to call logs in the upcoming minor releases. There are no call logs for the demo room! Therefore if you wish to see call logs in your dashboard, you need to use your personal room or a metered room after signing up.
Efficient Video bandwidth optimisation
Efficient bandwidth optimisation is important in order to bring stability into any video conference. Every Kb of data counts when the network connection quality degrades. This is specially valid for video as video transmission is expensive on the network and encoding/decoding is heavy on the CPU of the participant device. Therefore, we have deployed a few techniques to effectively optimise bandwidth.
First we start the camera only after the participant intends to / allowed to share his / her video camera in side the meeting. Else it is a audio only conversation. Previously we used to acquire the camera at the start of the meeting if the user has camera but don’t share the camera stream with other participants until the participant intends to / allowed to share his / her video camera. This technique used to consume 50Kbps to 80Kbps of extra bandwidth from the participant side to send the blank video frames to server through out the meeting. In a ideal network condition, this technique has no problem but when network condition degrades, this extra 50 Kbps of data become a burden on the already choked network.Therefore we now only acquire the camera when it is really necessary and start the video transmission.
Once the video transmission is started, we have used a second technique called simulcast to send 3 video qualities to the server from the sender and decide at the server to select the video quality to send to the receiver based on the network quality of the receiver. This helps in efficient upgrade / downgrade of the video quality of the receiver with a goal to keep the receiver connected to the meeting at least with audio.
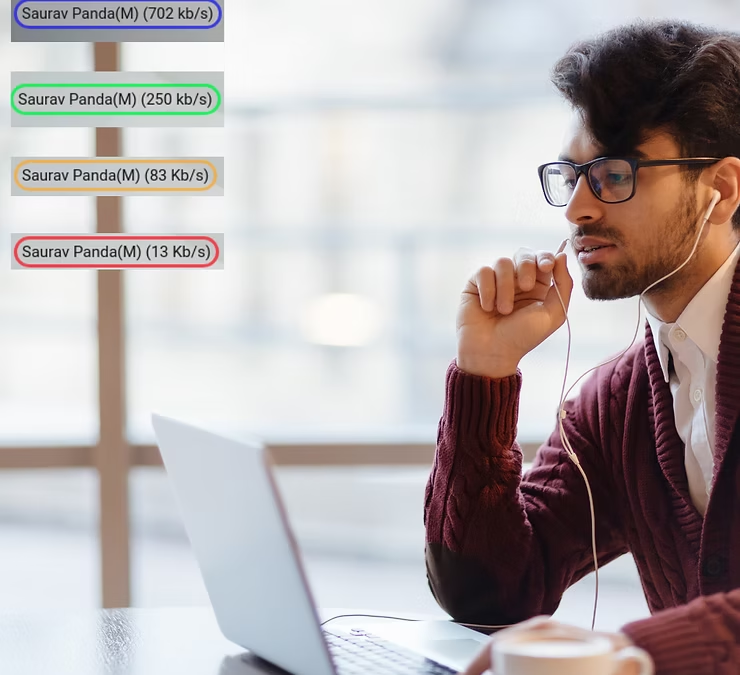
The 3rd technique we have used is to develop a small algorithm to calculate the real time bit-rate every participant is sending and receiving and then attaching a colour code to it. It informs everybody inside a meeting about everybody’s network capacity in real time. Anytime a participant’s colour turns red, everybody else inside meeting recognises about the possibility of a network outage for that participant.
We are not able to write details about all the other improvements due to limitation on time and resources currently available with us. If you have visited the CVR some time ago, then it is a good time to visit again.
We are reachable on email at hello@centedge.io if you wish to know more about CVR or Centedge. If you are interested in running a dedicated version of CVR for your enterprise use, in a custom Centedge subdomain like meet or you want to run it on your own domain like www.xyz.com, feel free to let us know. Also feel free to get in touch with us If you are looking for similar or new feature implementations in your existing services using WebRTC for video conferencing or live streaming.
You also can chat with us using the chat widget on this website. We typically respond within 5 minutes or sooner for chat and 1 day (max.) for email. Here is our LinkedIn page to stay connected.
Autoscaling WebRTC apps are not at all easy. A lot of discussion on building large-scale WebRTC apps gets stuck on how to scale. There are no straightforward answers available to this question yet. For this reason, we at CentEdge have developed CWLB, a general-purpose WebRTC load balancer using mediasoup as the media server at its core.
When a customer connects with us to help them build WebRTC apps, the conversation goes something similar to this.
Customer: We want to integrate video conferencing capabilities in our existing web app.
Us : Sure. We can help you with that.
Customer: Our requirement is to have 15 person(max) conferencing rooms with recording capabilities.
Us: Sure. We can help you with that as well.
Customer: We want the solution to be super scalable so that even a million rooms can be started at the same time. We have our own data centre and you can run Kubernetes clusters there. We hope this will be fine for scaling requirements.
Us: No. Kubernetes clusters may not be sufficient to scale WebRTC apps considering the stateful nature of them. Also memory and cpu usage may not be the right indicators for indicating server load in this case.
Customer: What is stateful nature? Why memory and cpu usage are not the right indicators?
Us:….
The conversation goes on where we make our customers fully understand the nature of WebRTC calls and the media server parameters which indicate correctly the current load. Towards the end of the conversation, this question of how should the scaling problem be solved, used to remain open for further discussions as we did not have a ready-made answer for this.
After going through a similar conversation several times, we decided to do something about it. 1st June 2021 is when we started working on a general-purpose load balancer to auto-scale WebRTC apps. After a year of considerable effort, we have successfully developed the load balancer to auto-scale WebRTC apps. We call it CWLB, which stands for Centedge WebRTC Load Balancer. CWLB supports both horizontal as well as vertical autoscaling. Mediasoup is the media server used behind the load balancer to scale WebRTC apps and it currently supports AWS as the cloud provider to create/delete on-demand mediasoup media servers.
Before moving on to discuss more CWLB, we will elaborate on some keywords which we mentioned in the above para for a better understanding of the context.
Why Autoscaling?
The first important question is, why does one need autoscaling? Because one needs more video rooms simultaneously which is beyond the capabilities of a single media server. Let’s look at an example.
A c5.2xLarge instance of aws (8vCPU & 16Gb RAM) can handle either one large 50-person conference room or 10 small 5-person conference rooms. Once the server is on full load, it can’t cater to any new room creation requests until the rooms running in it are closed. One option is to run multiple simultaneous servers to handle more load irrespective of whether new room requests are coming or not. In this case, it will be huge wastage of resources as one has to pay the server bills while the servers are idle most of the time.
There may also be instances where servers may be required only at a specific time but not all the time. In this case, one needs to manually create new servers just before they are needed and create a mechanism to route new room creation requests to the newly created servers. Once the need is over, again the servers are needed to be shut down and closed manually. This is still okay if the demand for video room creation is predictable as one will get the time for the creation of new servers but it is nearly impossible if the room creation time s highly unpredictable. An example of a predictable load is a church prayer service that happens every day at the same time or a scheduled board meeting that happens every week / every month on a specific date and time. These kinds of services give one ample time to create new servers to cater to these prescheduled demands. An example of an unpredictable service is a teaching-learning app where any teacher can log in at any time to start a room. In this case, the room creation requests are so random that one won’t get any time to create new servers. Therefore it is impossible to scale manually in case of an unpredictable load.
To solve the above-mentioned problems, a load balancer is used in front of the media servers whose job is to distribute the incoming load among the available servers based on a predefined algorithm. If no more media servers are available, then create new ones. If some of the media servers are idle, then delete them so that valuable resources can be saved. A load balancer is a must to cater to unpredictable load scenarios. Also, it is good to have for predictable load scenarios because it saves a lot of manual effort while minimizing the chance of error happening from the manual effort.
Is Autoscaling mandatory?
No. It is not mandatory for all kinds of WebRTC applications. When an application has a finite amount of load and also the load is predictable, then autoscaling may not be needed in this case.
Example:
If you have a small school with 100 students in 5 grades which makes 20 students (approx.) in each grade. In this case, an 8vCPU X 16GB RAM server running for 24 X 7 should be economical as well as sufficient enough to handle the peak load of all 5 grades running their classrooms simultaneously. For this kind of use case, adding a load balancer will add a lot of complexity and cost rather than saving it.
Why mediasoup?
Because mediasoup is one of the most capable media servers available out there today with high-performance metrics. It has many cutting edge features like
Simulcast & SVC
Congestion control
Multi-stream (ability to send multiple streams over a single peer connection)
Sender & Receiver side bandwidth estimation
A tiny Nodejs module for easy integration with existing large Nodejs applications
super low-level APIs to provide minute control over media stream flows
Features like ice restarts and prioritization provide application flexibility
We have used the majority of the capabilities provided by mediasoup in our load balancer to provide enough flexibility to our customers who will be using our load balancer to build their super scalable applications on top of it.
Why aws?
Because aws is the leading cloud provider today it is used by many enterprises, and startups as well as individuals for hobby projects. It also has best-in-class uptime and trust among its users. It has very elaborated and easy-to-follow documentation for developer adoption. Also, their critical APIs which are used by our load balancer to scale media servers, are stable with less change frequency. For all of the above reasons, we choose aws as our first cloud provider for CWLB. We will eventually plan to support all leading cloud providers including Microsoft Azure, Google Cloud, Oracle Cloud, Digital Ocean, OVH cloud, etc., once our aws offering is complete and stable.
There can be 4 possible strategies using which one can auto-scale a webrtc application.
Horizontal scaling
Vertical scaling
Hybrid scaling
Hybrid+ scaling
Horizontal Scaling
This is the suitable mode of scaling if your use case needs smaller meeting room sizes of 2-5 users in each but a lot of such rooms are needed simultaneously.
A good example will be of a video contact center where 100+ customer support agents attend daily calls from customers. It is primarily an one to one call between the agent and the customer until the agent’s supervisor and /or manager decide to join the call. In this case, there will be a maximum of 4 users in the conferencing room at any point in time but there will be 100+ / 500+ such rooms running at any point of time.
In this case horizontal load balancer can be used to distribute the load from first media server to second media server as soon as the load on the first server reached it’s peak. The load balancer would keep track of the real time usage and release resources whenever the load on first sever is reduced. This way the load balancer can upscale / downscale media server resources based on the real time load.
Vertical Scaling
This is the suitable mode of scaling if your use case needs larger meeting room sizes of 20 – 60 users in each but a smaller number of such rooms are needed simultaneously.
A good example will be of a school / educational institution where only 10 teachers conduct daily sessions for their respective classes. In this case, though relatively there will be more number of students in each of the sessions but a maximum of 10 such rooms for 10 teachers need to be run at any point in time.
In this case a vertical load balancer can be used to distribute the load from the first core of the media server to other available cores as soon as the load on the first core reached it’s peak. In this case, though only one media server maybe sufficient to cater to the whole school but effectively distributing load between all the available cores of the media server will be key to achieve the desired output from the media server. Here the load-balancer’s job would be to keep track of the real time usage and release resources whenever the load on each individual core of the media server is reduced.
The two load balancing strategies mentioned here are the two basic forms of media server load balancing in WebRTC. The other two approaches are advanced uses cases which needs more advanced load balancing with fine grain control. They are described in the second part of this blog series. the link to the 2nd part of the post is here.
CWLB
Introducing CWLB (Centedge WebRTC Load Balancer), a general-purpose WebRTC load balancer designed using mediasoup as the media server. It has been designed from scratch to cater to the demands of those enterprises who don’t want to use a video API vendor for certain reasons but want to use a dependable managed video infra with a dedicated support team, along with the possibility of customization of even the core media flows.
Features
Mediasoup as the media server
AWS/DigitalOcean as the cloud provider
Hybrid+ scaling
Highly flexible yet resource-efficient
An advanced load distribution algorithm with 85% efficiency (approx.)
Note: Currently with the CWLB v2 release, the efficiency of CWLB is 85%(approx.). Our goal is to reach >90% efficiency by the v3 release of CWLB.
Now we also have a production grade scalable in-house video conferencing solution named Meetnow on top of CWLB. It has been designed to truly unify your organization’s external and internal communication in the today’s remote first world. Some of the unique features are 2- 100 user room with different modes of one to one, conferencing and event, Complete meeting and attendance analytics, and last but not the least, pay only for real usage without any monthly / yearly commitments until you are sure about switching on to our Enterprise plan.
If you have mediasoup based open source project like mediasoup demo or edumeet which currently works great but does not autoscale then this is for you. If you have a BBB(bigbluebutton) / jitsi implementation currently in production which does not autoscale then this is for you. If you have any other open-source/custom-built video implementation in production which doesn’t autoscale, then this is for you. Even if your current production video setup is working fine but you may need something like this in near future Or you are just curious to know more about CWLB, feel free to drop us a note at hello@centedge.io / sp@centedge.io to know more about how we can help you. If you wish to schedule a free 30 mins discussion for your use case with one of our senior/principal consultants, feel free to do so using this link.