For seventeen years, ONVIF has answered one question for the physical security industry: how do you make a camera from one company talk to software from another? ONVIF Profile V is the organization’s first serious attempt to answer that same question for the cloud. But treat it as just another streaming profile and you’ll miss the more interesting story underneath it — Profile V doesn’t just open up cameras. It opens up the entire pipe those cameras feed into, and that pipe is exactly where the next fight in video surveillance is going to happen: not over who makes the camera, but over who gets to interpret what the camera sees.
This piece breaks down what ONVIF Profile V actually specifies, why ONVIF built it now, and — more importantly — what an genuinely open framework built on top of it should look like if the industry wants to avoid simply trading one kind of lock-in for another.
What Is ONVIF Profile V?
ONVIF Profile V is a draft ONVIF standard, released as a Release Candidate on July 9, 2026, that defines how cloud-based video surveillance should work across manufacturers. It specifies how a conformant camera or encoder establishes a secure connection to a cloud video management system (VMS), streams live video and audio over WebRTC, pushes encrypted recordings to cloud storage, and sends event notifications — all using a common interface that any Profile V-conformant device or client can implement, regardless of who built it.
In plainer terms: today, if you buy a cloud-connected camera, you are almost always locked into that vendor’s cloud software, because the connection between the two is proprietary. Profile V standardizes that connection. A camera that conforms to it should, in principle, work with any cloud VMS that also conforms to it — the same bargain ONVIF struck for on-premises video with Profile S back in 2011, and refined with Profile T, now extended to the cloud.
ONVIF expects to finalize the Profile V specification by the end of 2026, with certifiable, conformant products following after that.
Why ONVIF Built a Cloud Profile Now
To understand why this matters, it helps to see the problem it’s solving. Most cloud video surveillance today is built the way early smartphone ecosystems were: vertically integrated and closed. A customer buys a camera, and that camera only works with its maker’s own cloud backend. Cancel the subscription, and in many cases the hardware becomes far less useful — an arrangement pointed enough that at least one industry publication has taken to calling the pattern “Hostage as a Service.”
ONVIF Board Chairman Leo Levit framed the motivation plainly, saying the goal is for the shift to the cloud to give customers “more choice, not less” (ONVIF press release, July 2026). That’s a direct response to a market where the two dominant models are: closed VSaaS platforms that bundle proprietary cameras with proprietary cloud software (think Verkada, Rhombus, Cisco Meraki MV), and a smaller set of open VSaaS platforms (Eagle Eye Networks/Brivo, Milestone Arcules, and similar) that already accept ONVIF-compatible cameras from multiple brands.
Profile V also isn’t arriving in a vacuum technically. ONVIF has been building WebRTC support into its specifications gradually since June 2024, when it first published a WebRTC specification for peer-to-peer streaming as a lower-latency, firewall-friendlier alternative to the RTSP protocol that Profile S and Profile T rely on. That groundwork — refined through a December 2024 update and further extended in the June 2026 Core Specification — is what made a full WebRTC-native cloud profile possible. It’s worth noting this is happening alongside a separate, related move: ONVIF announced in October 2025 that it would retire Profile S itself, citing outdated authentication methods, and is steering the market toward Profile T for on-premises deployments. Profile V is the cloud-side continuation of that same modernization push.
How ONVIF Profile V Actually Works
Stripped of the marketing language, the mechanics of ONVIF Profile V are fairly straightforward:
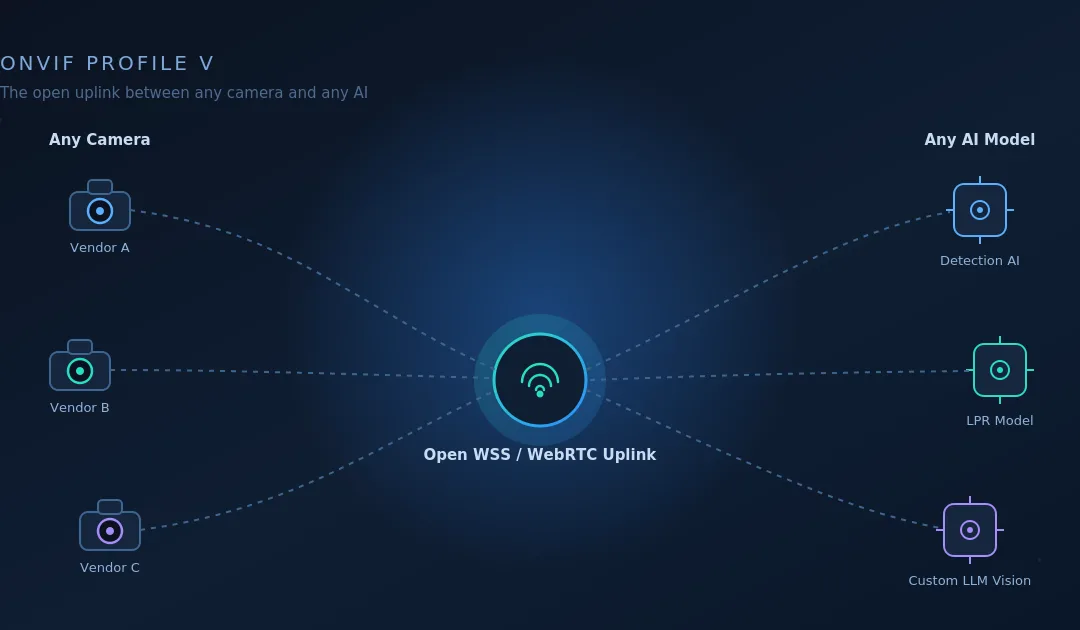
A conformant device — a camera, encoder, or video streaming app — opens a secure outbound connection to a conformant cloud client (a VMS or Video-Surveillance-as-a-Service platform) over the WSS (WebSocket Secure) protocol, called the Uplink. Because the connection is outbound, there’s typically no need for the installer to configure port forwarding or a VPN to reach a camera sitting behind a home or business firewall.
Authentication happens through mutual TLS (mTLS) and access tokens, not the username/password model that older ONVIF profiles used — a meaningful security upgrade.
Live video streams over WebRTC, using H.264 as the mandatory codec. If the device has a microphone and speaker, bidirectional audio streams the same way.
Recordings are encrypted and pushed to cloud storage — ONVIF names Amazon S3 and Microsoft Azure Blob Storage as reference targets — using MP4/CMAF container formats.
Events are delivered either as pull-point notifications over the Uplink channel or as JSON messages over MQTTS.
Security requirements are deliberately kept in a separate, companion specification called the Profile V Security Add-on rather than baked into the profile itself. Under ONVIF’s rules, a published profile’s contents can never be changed — so security requirements, which need to evolve as threats do, live in an add-on that can be revised independently. Every Profile V-conformant product must implement it. It mandates the OAuth 2.0 framework for authorizing devices, clients, and cloud services to exchange data, along with the encryption and container-format requirements for cloud-bound recordings.
For manufacturers, that means building to two documents, not one: Profile V for the streaming and connectivity behavior, and the Security Add-on for how that connection gets trusted and how footage gets protected in transit and storage.
The Real Opportunity: Openness Has Two Axes, Not One
Here’s where it’s worth stepping back from the spec sheet, because the headline framing — “ONVIF makes cloud cameras interoperable” — undersells what’s actually opening up.
Look at how the current cloud surveillance market is actually built, and a pattern emerges. It splits along two independent dimensions: who makes the camera, and who interprets what the camera sees. Every major platform today picks a position on both:
Closed camera + closed AI: Verkada, Rhombus, and similar platforms bundle proprietary hardware with their own built-in analytics. You get their camera and their AI, full stop.
Open camera + still largely closed AI: Eagle Eye Networks/Brivo, Milestone Arcules, and comparable “bring your own camera” platforms solved half the lock-in problem — any ONVIF-compatible camera works — but the analytics layered on top is typically still the platform’s own bundled offering.
Notice what’s missing from that list: open camera + open AI. Nobody has clearly built the platform where you can point any conformant camera at a cloud endpoint and choose, per camera or per customer, which AI model interprets the footage — a license-plate model from one vendor, a weapons-detection model from another, a custom vision-language model for a specialized use case, all running against the same underlying video feed without re-architecting anything.
That’s the gap ONVIF Profile V actually creates room for. Because Profile V standardizes the device-to-cloud handoff — any conformant camera speaks the same WSS/WebRTC uplink language regardless of manufacturer — it removes the need for a cloud platform to build a bespoke integration per camera brand. Once that integration cost disappears, the natural next question for any platform sitting at that uplink is: why should the AI on top be locked in too? If camera choice can be open, interpretation choice can be open as well, and the two openness axes reinforce each other rather than competing.
What an Ideal Openness Framework Should Look Like
If the industry takes this seriously, an openness framework built on Profile V should extend the same design principle ONVIF applied to cameras up through the rest of the stack. Three things define what that should look like in practice:
A neutral, standards-conformant ingestion point. The cloud endpoint receiving the Profile V Uplink shouldn’t privilege any single camera brand — any conformant device should be able to latch onto it exactly the way the spec describes, with no vendor-specific quirks required on either side.
Frame-level extraction decoupled from a single analytics engine. Once video is flowing through that uplink, the platform should treat “getting frames out of the stream” and “interpreting those frames” as two separate, swappable jobs — not one bundled black box. A retailer might want a loss-prevention model; a warehouse might want a safety-compliance model; an enterprise might want to run its own fine-tuned vision model entirely. The infrastructure shouldn’t care which, as long as it can hand off frames in a consistent way.
Composability as the default, not an add-on. The platform in the middle should function less like a surveillance vendor and more like infrastructure — closer to how a payments processor sits neutrally between banks and merchants, or how a message queue sits neutrally between producers and consumers. It succeeds by being useful to both the camera side and the AI side simultaneously, not by capturing value from either.
This is, functionally, the architecture Samvyo’s WebRTC and AI pipeline is already built around — which is the point worth drawing out.
What Changes for Whom
For camera manufacturers, Profile V removes the need to build and run an entire proprietary cloud backend just to offer a cloud-connected product — they can build to the standard and let a conformant cloud client handle the rest, the same way Profile S let them skip building proprietary VMS software for on-premises deployments.
For system integrators, it means a cloud deployment stops being a single-vendor commitment. A camera, a VMS, and a storage provider all become independently replaceable components.
For closed VSaaS incumbents, it raises a real strategic question: their lock-in has historically been a feature of the business model, not a bug, and Profile V gives buyers a standards-based alternative to point to in procurement conversations.
For AI and analytics vendors, an open uplink plus composable interpretation means competing on model quality and accuracy rather than on which hardware ecosystem they managed to get bundled into.
For end customers, the pitch is straightforward: cloud video without the hostage dynamic, and eventually, video intelligence without being stuck with whichever AI model happened to ship with the camera.
Current Status and Realistic Timeline
It’s worth being precise about where things stand, since “open standard” headlines tend to outrun the calendar. ONVIF Profile V is at Release Candidate stage — open for review and testing by ONVIF member companies, not yet finalized. ONVIF expects to finalize the specification by the end of 2026. Only after that can manufacturers build to a frozen spec and pass ONVIF’s conformance testing to claim certified support, which realistically pushes certifiable Profile V products into 2027. The opportunity described here is a build-toward-now proposition, not a ship-today one.
For readers who’d rather see this tap-decode-interpret-reinject pattern in working code than take it on faith, Samvyo’s engineering team published a byte-level walkthrough of it the day before this piece: Building Real-Time Media AI Pipeline with opensam: From RTP Packets to AI and Back, Byte by Byte. It documents opensam, an open-source reference baseline on GitHub (github.com/Samvyo/opensam) that taps a live WebRTC session, parses raw RTP by hand into Opus audio and VP8 video, decodes both into PCM and pixel frames, routes them through STT/LLM/TTS and vision models, and re-encodes the result back into the stream — the same extract-interpret-reinject shape a Profile V-style openness framework needs, demonstrated end to end in about 400 readable lines. It’s deliberately built and documented as a proof-of-concept rather than a hardened production system, precisely so anyone evaluating this pattern can clone it, read every step the bytes take, and decide for themselves whether it does what they need before reaching out for anything more.
Where Samvyo fits into this picture is on the infrastructure side of that gap. Samvyo’s WebRTC SDK is already built for sub-100ms, hardware-accelerated media delivery — using GStreamer for capture, encoding, and rendering across GPU, VPU, and DSP acceleration — and its embedded/IoT WebRTC product already lists industrial surveillance and connected-device video among its supported use cases. Combined with Samvyo’s real-time AI SDK, which already pulls structured insight out of live video and audio streams for other industries, the same event-driven pipeline architecture generalizes naturally into exactly the kind of composable, ingest-once-interpret-with-anything layer that a Profile V-aligned openness framework calls for: any camera latching onto a WSS/WebRTC endpoint, with frames handed off to whichever third-party AI model the deployment actually needs.
Frequently Asked Questions
What is ONVIF Profile V? ONVIF Profile V is a draft ONVIF standard for cloud-based video surveillance, released as a Release Candidate in July 2026. It defines how conformant cameras and encoders connect securely to cloud video management systems, stream live video and audio over WebRTC, and push encrypted recordings to cloud storage.
How is Profile V different from Profile S and Profile T? Profile S and Profile T govern on-premises IP video streaming using RTSP as the transport protocol. Profile V governs cloud video surveillance specifically, using WebRTC over a secure WSS uplink instead, and is designed to work behind local firewalls without port forwarding or a VPN.
Does ONVIF Profile V replace RTSP? No. RTSP remains the streaming protocol for local, on-premises ONVIF profiles. Profile V is WebRTC-native by design specifically for its cloud use case; it doesn’t change how Profile S or Profile T devices stream locally.
When will ONVIF Profile V be finalized? ONVIF has stated it expects to finalize the Profile V specification by the end of 2026. Certified, conformant products are expected to follow the finalized spec, making 2027 the realistic window for commercially available Profile V hardware.
What is the ONVIF Profile V Security Add-on? It’s a companion specification that every Profile V-conformant device and client must implement. It requires OAuth 2.0-based authentication using mutual TLS and access tokens, and specifies how recorded video and audio must be encrypted before being pushed to cloud storage. It’s kept separate from the core profile so security requirements can be updated over time.
Does Profile V mean any camera works with any cloud VMS? That’s the goal, in the same way Profile S and Profile T made local cameras and VMS software interoperable across brands — but only for products that are actually certified as Profile V-conformant, which requires passing ONVIF’s conformance testing once the spec is finalized.
What codec does ONVIF Profile V use for video? H.264 is the mandatory codec for Profile V conformant devices and clients. H.265 is not currently part of the Profile V requirement set.
Why does composable AI matter for ONVIF Profile V? Profile V solves camera-side lock-in by standardizing how cameras connect to the cloud. It doesn’t, by itself, address analytics-side lock-in — most cloud VMS platforms still bundle their own AI. An openness framework that pairs Profile V’s camera-agnostic uplink with a composable, swap-any-AI-model interpretation layer extends the same open-standards principle to the part of the stack that currently has no equivalent standard.
Sources: ONVIF Profile V press release and technical FAQ (onvif.org, July 2026); ONVIF WebRTC specification history (v24.06, v24.12, v26.06); ONVIF Profile S deprecation announcement (October 2025); industry coverage via Security Info Watch, Security Sales & Integration, and SecurityWorldMarket.
The promised technical tour — how an AI process taps a mediasoup SFU, turns Opus and VP8 packets into PCM and pixels, runs them through models, and streams synthesized speech back into a live call.
This is the second of two posts. The first covered whatopensam lets you build and why an owned baseline matters. This one is the how: the plumbing, the codecs, and the loop.
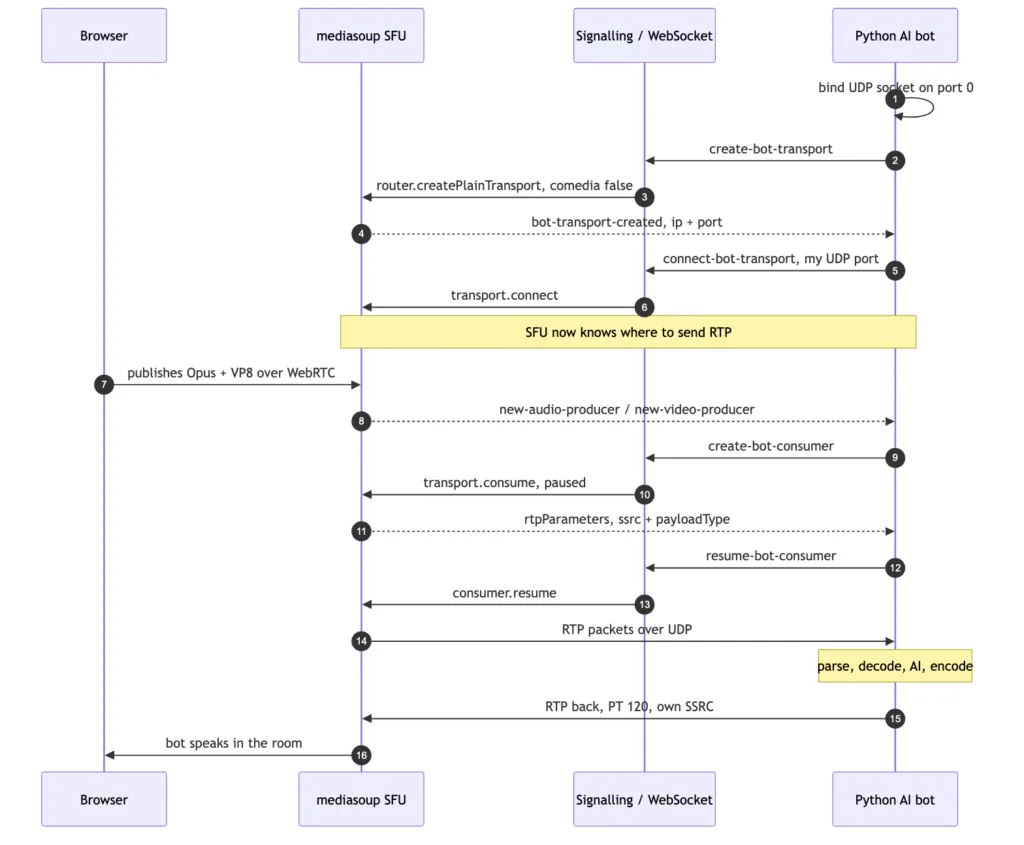
The tap handshake: how a plain Python process becomes a participant in a mediasoup call — and the exact moment RTP starts flowing.
What this pipeline actually does, in one paragraph
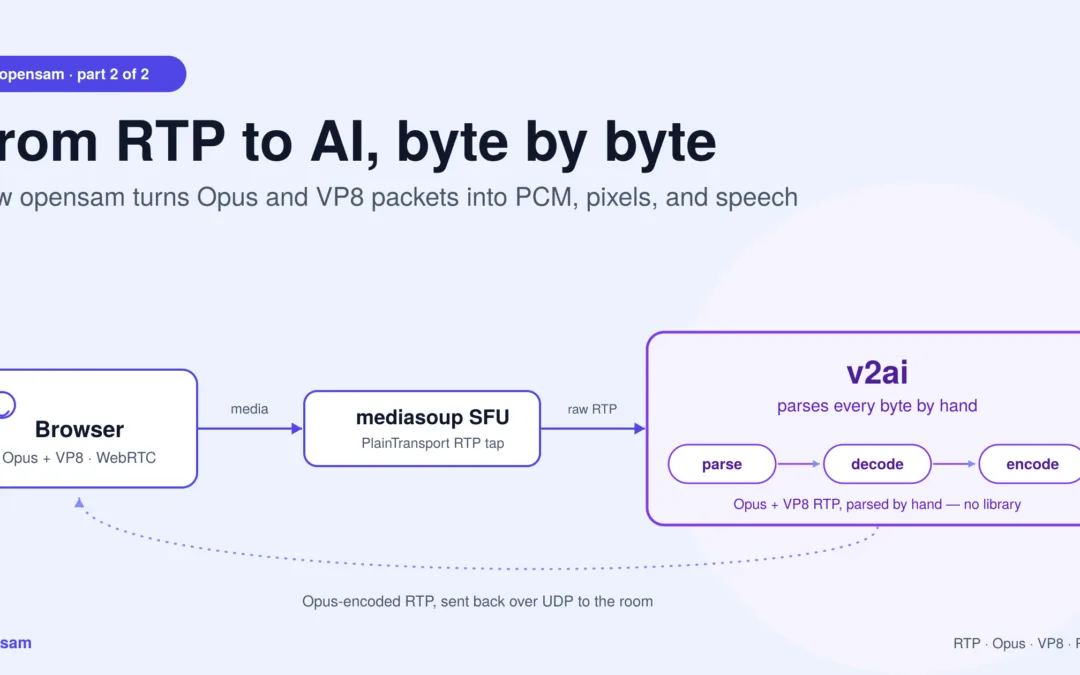
opensam‘s real-time media AI pipeline is the code path between a browser’s WebRTC stream and an AI model: it taps a mediasoup SFU over a PlainTransport, parses raw RTP by hand into Opus audio and VP8 video, decodes both to PCM and pixel frames, runs them through STT/LLM/TTS or vision models, and re-encodes the result as RTP packets sent back into the room. No framework sits between you and any of those steps — everything below is the literal path the bytes take.
Why this layer is worth understanding
Every real-time media-AI framework eventually does what’s described below — it just does it behind an abstraction. The reason to look at it directly is simple: the abstraction is where your unusual requirement goes to die. When you need a video frame at a different cadence, a codec nobody templated, or media injected back on a path the framework didn’t anticipate, you need to know what’s actually on the wire.
opensam is small enough to hold in your head. Here’s the whole path through this real-time media AI pipeline.
1. The tap: getting RTP out of an SFU
A browser’s media reaches the SFU over WebRTC — DTLS-encrypted, ICE-negotiated, the full stack. An AI process doesn’t want any of that. It wants raw packets.
mediasoup’s answer is PlainTransport: a transport that speaks plain, unencrypted RTP over UDP. The server creates one per bot:
js
const transport = await room.router.createPlainTransport({
  listenIp: { ip: '127.0.0.1' },
  rtcpMux: true,      // RTP and RTCP share one port
  comedia: false,     // we will tell the SFU where to send
});
comedia is the subtle knob, and opensam uses it in both directions:
Receiving (comedia: false) — the bot binds its own UDP socket on port 0 (the OS picks a free port), reads the assigned port back, and hands it to the server over WebSocket signalling. The server calls transport.connect({ ip, port }) and now knows exactly where to fire packets.
Sending (comedia: true) — the reverse. The SFU learns the bot’s source address from the first packets it receives. That’s why the bot fires five 440 Hz tone frames on startup: they’re a warm-up whose only job is to teach mediasoup where the bot lives. Without them, the SFU has no return address.
Media doesn’t flow at connect() though. It flows when a consumer is created against a producer and resumed:
js
const consumer = await entry.transport.consume({
  producerId, rtpCapabilities: room.router.rtpCapabilities, paused: true,
});
// ...later
await consumer.resume();   // <- the exact moment RTP starts hitting the bot's socket
Consumers are created reactively: when a participant publishes, the server emits new-audio-producer / new-video-producer over signalling and the bot spins up a consumer for it. People joining late Just Work. The consumer’s rtpParameters come back with the SSRC and payload type — and the bot records ssrc → peerId, which is how it later knows who is speaking.
Crucially, audio and video consumers share the same plain transport — so both land on one UDP socket, interleaved, distinguished only by payload type.
2. One socket, two media types: parsing RTP by hand
There’s no RTP library here. The bot reads a datagram and walks the bytes.
RTCP shares the port. With rtcpMux: true, receiver reports and PLIs arrive on the same socket. They’re filtered by checking whether byte 1 falls in the RTCP packet-type range (200–206) and discarded.
The header is variable-length. Real size is 12 + (CC × 4), and if the X bit is set, plus 4 + (extension_length × 4). Getting this wrong hands your decoder garbage.
The header extension carries a gift. WebRTC negotiates the one-byte extension profile 0xBEDE, and inside it, extension ID 6 is ssrc-audio-level — the browser’s own measurement of how loud that packet is, 0 = loud, 127 = silence. The bot parses it and skips packets above a threshold of 40 before they ever reach the Opus decoder. It’s a free VAD pre-filter computed by the sender.
Dispatch is then one branch: payload type 101 → VP8, anything else → Opus.
3. The audio path: Opus → PCM → 16 kHz mono
mediasoup delivers Opus as the browser encoded it: 48 kHz, stereo, 20 ms frames — 960 samples per channel.
That’s 960 samples × 2 channels × 2 bytes = 3840 bytes of PCM per packet. A decoder is created per SSRC — each speaker gets their own, because Opus is stateful.
That statefulness drives the error handling. A corrupt or missing packet doesn’t just lose 20 ms; it poisons the decoder. So on a decode exception the bot rebuilds the decoder, returns a frame of silence, and skips the next three packets to let the stream resynchronize. Crude, but it prevents one bad packet from producing seconds of noise.
Speech models want mono at 16 kHz, so the final step is a downmix and resample:
Going down in rate is the direction that actually demands care: without a low-pass filter first, everything above 8 kHz folds back into the audible band as aliasing — and you’d be feeding that to your STT. soxr filters properly, and it keeps one resampler per SSRC, mirroring the per-SSRC Opus decoders, so one speaker’s filter state never bleeds into another’s.
Out the other side: clean 16 kHz mono PCM, tagged with the SSRC that produced it — which resolves to a participant name.
4. The listening loop: VAD → STT → LLM → TTS
PCM lands on an asyncio.Queue, and a forwarding task turns a stream of packets into utterances.
Silero VAD is picky: exactly 512 samples at 16 kHz — 1024 bytes, 32 ms. So the loop accumulates PCM into a buffer and drains it in exact 1024-byte chunks, converting each to a normalized float32 tensor and running the model (in an executor, so the event loop keeps breathing).
Around that sits a small state machine with hysteresis:
2 consecutive speech chunks confirm onset (~64 ms) — short enough to feel instant, long enough to reject a cough.
20 consecutive silence chunks (~640 ms) end the utterance and trigger finalize(), flushing the buffered speech to STT.
Speech chunks stream to Deepgram live (Whisper is the offline fallback). Transcripts below 0.70 confidence are dropped. Survivors get a wake-word check, then PII scrubbing before any text reaches the LLM.
The LLM stage streams from Claude — and the interesting trick is that it doesn’t wait for the full reply. It splits the token stream on phrase boundaries (.!?;:) and pushes each finished phrase onto a TTS queue immediately. The bot starts speaking the first clause while the model is still writing the rest. That single decision is worth more perceived latency than any model swap.
Tool use loops the conversation at most twice: Claude may call summarise_meeting or extract_action_items, the bot builds the context from its transcript log, feeds the result back, and Claude streams its spoken reply.
Barge-in is blunt and effective: any confirmed speech while the bot is talking cancels every active TTS task and drains the queue. The human always wins.
Wrapped around all of it: OpenTelemetry spans per stage, a circuit breaker that trips to a canned fallback line when the LLM misbehaves, and a per-room token/cost tracker.
5. The video path: VP8 → frames → vision
When payload type is 101, the bytes take a different road.
After the RTP header comes the VP8 payload descriptor (RFC 7741) — a variable-length preamble that is not part of the codec bitstream and must be removed:
Byte 0: X N S R PPPP — X says an extension byte follows.
Extension byte: I L T K RRRR.
If I: PictureID is 1 or 2 bytes, decided by the top bit of the first byte.
If L: TL0PICIDX, 1 byte. If T or K: they share 1 byte.
Only what’s left is VP8.
Then reassembly. A video frame is far bigger than a UDP datagram, so it arrives in fragments. The bot accumulates payloads per SSRC and treats the marker bit as “frame complete”:
python
self.frame_buffers[ssrc].extend(payload)
if marker == 0:
    return []                       # not done yet
complete_frame = bytes(self.frame_buffers[ssrc]); self.frame_buffers[ssrc].clear()
Before decoding, a keyframe gate. PyAV cannot decode inter frames without a reference, and a bot that joins mid-stream arrives in the middle of a GOP. VP8 marks frame type in bit 0 of the first byte (0 = keyframe), so inter frames are dropped until the first keyframe appears. To avoid waiting for the browser’s natural keyframe interval, the bot asks for one: a request-keyframe signal triggers consumer.requestKeyFrame() on the server, which sends a PLI upstream and the browser produces a keyframe immediately.
Decode is PyAV: av.CodecContext.create("vp8", "r"), wrap the bytes in an av.Packet, get VideoFrames. On error, reset the codec and re-arm the keyframe gate.
Raw frames are then sampled to ~1 fps — you don’t need 30 fps to summarize a slide, and vision tokens cost money — JPEG-encoded at quality 85, and handed to a vision chain that tries Claude Sonnet, falls back to on-prem LLaVA, then Haiku. Nothing runs unless the sharing participant has ticked the AI-consent box.
6. The return path: PCM → Opus → RTP → the room
Injection is the mirror image, hand-rolled — the last leg of the real-time media AI pipeline, and the one most frameworks hide completely.
TTS audio is normalized once per utterance — RMS measured, gain applied toward a target dBFS, capped and clipped — then handed to the sender, which:
Resamples to 48 kHz stereo, honoring the rate the frame declares.
Buffers and drains in exact 3840-byte frames — Opus will not accept a partial frame.
Encodes with opuslib.Encoder(48000, 2, APPLICATION_VOIP).
Builds a 12-byte RTP header by hand: byte0 = 0x80 (V=2), PT = 120, sequence +1, timestamp +960, fixed SSRC.
sendto() the SFU.
Step 1 deserves more respect than it usually gets, because of an invariant that runs through this whole layer: every RTP packet carries exactly 20 ms. The timestamp advances by a fixed 960 ticks whether or not the audio inside it is correct. Nothing downstream will tell you the rate was wrong — the stream stays perfectly well-formed and simply plays at the wrong speed.
TTS rates vary in practice: Deepgram and Cartesia render at whatever TTS_SAMPLE_RATE asks for, while Kokoro ignores the request and always renders at its native 24 kHz. So the input rate is a fact to be read, never assumed:
Two details make this correct rather than merely plausible:
The resampler is stateful. A resampler is a filter, and a filter has memory. Audio arrives in ~1024-sample chunks, and one restarted at every chunk boundary produces a click at every seam — 20-odd times a second. soxr.ResampleStream carries its state across calls, so the chunks join as one continuous signal:
python
self._resampler = soxr.ResampleStream(sample_rate, SAMPLE_RATE, 1,
                                      dtype="int16", quality="HQ")
mono = self._resampler.resample_chunk(mono)   # state persists between calls
Interpolation, not repetition. Repeating each sample N times (a zero-order hold) is only coincidentally right when the ratio is an exact integer, and it’s a stair-step waveform with audible aliasing even then. A real resampler interpolates and handles non-integer ratios — which is the whole point, since the code shouldn’t care whether it’s handed 16 kHz, 24 kHz, or 48 kHz.
The one thing to understand about a proper resampler is that it holds about 20 ms inside its filter. That reads like lost audio until you measure it: stream 10 seconds and you’re 20 ms short; stream 30 seconds and you’re still 20 ms short. It’s constant latency, not accumulating drift — and those samples aren’t lost, they emerge as the next chunk pushes them through (the comfort-noise worker guarantees there’s always a next chunk).
The payoff is a timing invariant you can actually assert: feed five seconds of audio at 16 kHz, 24 kHz, or 48 kHz, and five seconds of speech comes out — every time.
The declaration has to be true
A resampler that honors a declared rate is only as good as the declaration, and this is where it gets interesting. The obvious design — “read the rate from config” — is wrong, because config describes what was requested, not what was rendered. Kokoro ignores the request entirely.
Worse, the provider isn’t fixed for the lifetime of the process. Cartesia owns a fallback chain — Cartesia → Deepgram → Kokoro — so a single failed API call means this sentence comes back at 24 kHz while the previous one was at 16 kHz. Config can’t express that; only the object that produced the bytes knows.
So each provider reports its own truth, and the chain updates it to match whoever actually served the utterance:
kk = KokoroTTS()
self.sample_rate = kk.sample_rate   # the chain adopts the fallback's rate
The consumer then reads the rate from the provider rather than from config — and, importantly, reads it after the stream is drained, when it reflects who really answered:
This is the general shape of the lesson, and it outlives this codebase: in a media pipeline, metadata must travel with the payload. The moment a rate, a codec, or a channel count is inferred from configuration instead of read from the thing that produced the bytes, you’ve built a system that is correct only until the first fallback fires — and it will fail silently, because a wrong sample rate produces a perfectly well-formed stream.
The server was told what to expect via make_rtp_parameters(ssrc, payload_type=120) at create-bot-producer time — the bot’s declaration of its own codec, clock rate, channels, and SSRC. A comfort-noise worker keeps silent frames flowing when nobody’s talking, so the stream never goes stale.
A baseline earns trust by being honest about its shortcuts. These are deliberate trades for readability, and the first things to revisit if you push this real-time media AI pipeline past a POC:
Payload type 101 is hardcoded for VP8, and everything else is assumed to be Opus. The server does return the real payload type in rtpParameters — the bot just doesn’t read it. It works because this router’s two-codec config lands there; add a codec or enable RTX and audio/video misroute.
Video decodes inline on the audio loop. Audio reads go through an executor, but VP8 decode and JPEG encode run in the same coroutine — under heavy screen share, that’s audio jitter.
No jitter buffer, no sequence reordering. Frames are reassembled by concatenation and the marker bit. UDP reordering or loss yields a corrupt frame and a decoder reset.
A fixed SSRC of 12345678 identifies the bot’s outgoing stream. Fine for one bot; not fine for many in a room.
The bot’s own audio is never echo-cancelled. It works because the bot’s speech goes out on a different path than the audio it consumes — but put a real speaker and mic in the loop and you’ll want AEC.
None of these are mysteries. That’s the point: you can see every one of them, because the code is 400 lines you can read, not a framework you must trust.
POC now, production later
Disclaimer.opensam is intended for proof-of-concept and educational use. It is a reference baseline for understanding and prototyping real-time media AI — deliberately minimal and readable. It is not hardened for production: it does not guarantee the latency budgets, jitter resilience, packet-loss recovery, multi-tenant scale, or security posture that live products require.
Read this stack to learn exactly where the bytes go and what your product actually needs. When the POC earns the right to ship, the Samvyo media stack delivers these same capabilities — transport, raw media access, audio and vision pipelines, media injection — engineered for the latency, scale, resilience, and compliance production demands. Prototype this real-time media AI pipeline on the open baseline; productionize on the stack built for it.
Read the code
The whole media path is a handful of files on the development branch under v2ai/ai-bot/src/pipeline/:
File
What it owns
signalling.py
The tap handshake — transports, consumers, comedia, PLI
rtp_receiver.py
RTP parsing, RTCP filtering, audio-level extension, Opus decode, VP8 dispatch
VAD state machine, STT, streaming LLM, barge-in, TTS orchestration
rtp_sender.py
Opus encode, hand-built RTP headers, injection back into the SFU
bash
git clone git@github.com:Samvyo/opensam.git && cd opensam && git checkout development
Fork it, instrument it, break it. Once you can see the packets, nothing about a real-time media AI pipeline is magic anymore.
Frequently asked questions about opensam’s RTP-to-AI pipeline
What is a real-time media AI pipeline?
A real-time media AI pipeline is the code path that moves a live audio or video stream from a call into an AI model and back — parsing the transport protocol (RTP), decoding the codec (Opus for audio, VP8 for video) into raw PCM or pixel frames, running inference, then re-encoding and injecting the result back into the call, all with latency low enough to feel live.
What is mediasoup’s PlainTransport and why does opensam use it?
PlainTransport is a mediasoup transport that sends and receives plain, unencrypted RTP over UDP instead of the DTLS-encrypted, ICE-negotiated path a browser uses. opensam’s AI bot creates one PlainTransport per bot so it can read raw RTP packets directly, without implementing the full WebRTC handshake just to access media it will immediately decode.
What does comedia do in mediasoup, and how does opensam use it?
comedia controls whether a PlainTransport learns its remote address automatically. opensam sets comedia: false when receiving — the bot explicitly tells the SFU its UDP port via signalling — and effectively comedia: true behavior when sending, firing five silent warm-up tone frames so the SFU learns the bot’s source address from the first packets it sees.
How does opensam decode Opus RTP audio into PCM in Python?
opensam creates one opuslib.Decoder(48000, 2) per SSRC (per speaker, since Opus is stateful), decodes each 20 ms packet into 3840 bytes of 48 kHz stereo PCM, downmixes to mono, then resamples to 16 kHz with soxr — a proper filtering resampler, since a naive downsample would alias frequencies above 8 kHz into the audible band before the audio reaches speech-to-text.
How does opensam decode VP8 video from RTP packets?
opensam strips the VP8 payload descriptor defined in RFC 7741, reassembles fragmented RTP payloads into a complete frame using the RTP marker bit, drops inter frames until a keyframe arrives (requesting one via PLI if needed), and decodes the result with PyAV’s av.CodecContext.create("vp8", "r") into raw video frames.
Why does opensam parse RTP by hand instead of using an RTP library?
Parsing RTP directly — reading the 12-byte header, handling the variable-length extension, filtering RTCP by packet type — keeps the entire real-time media AI pipeline visible and debuggable in a few hundred lines of Python, rather than hidden inside a general-purpose library’s abstractions. It also lets opensam extract non-standard data, like the browser’s ssrc-audio-level header extension, as a free VAD pre-filter.
How does opensam send AI-generated speech back into a mediasoup call?
Text-to-speech audio is resampled to 48 kHz stereo with a stateful soxr.ResampleStream, buffered into exact 3840-byte Opus frames, encoded with opuslib.Encoder(48000, 2, APPLICATION_VOIP), wrapped in a hand-built 12-byte RTP header with an incrementing sequence number and timestamp, and sent over UDP to the SFU via sendto().
Why does the TTS sample rate matter so much in a real-time media AI pipeline?
Every RTP packet in this pipeline is assumed to carry exactly 20 ms of audio; the timestamp advances by a fixed amount regardless of whether the sample rate is correct. Because TTS providers can render at different native rates (and fail over to one another mid-stream), opensam reads the sample rate from whichever provider actually produced the audio rather than from static configuration — otherwise the stream stays well-formed but plays back at the wrong speed, silently.
What are opensam’s known limitations in this pipeline?
opensam hardcodes payload type 101 for VP8, decodes video inline on the audio coroutine (risking jitter under heavy screen share), has no jitter buffer or RTP sequence reordering, uses a fixed outgoing SSRC (fine for one bot, not many), and does not echo-cancel its own audio. These are documented, deliberate trade-offs for a proof-of-concept baseline, not hidden defects.
Where is opensam’s RTP pipeline code?
The pipeline lives under v2ai/ai-bot/src/pipeline/ on the development branch at github.com/Samvyo/opensam, split across signalling.py (the tap handshake), rtp_receiver.py (RTP parsing and Opus decode), vp8_decoder.py (VP8 reassembly and decode), bot.py (the VAD/STT/LLM/TTS loop), and rtp_sender.py (encoding and injection back into the SFU).
How the opensam open-source stack gives developers a from-first-principles alternative to frameworks like Pipecat — and the raw building blocks to prototype real-time media AI for voice and video use cases nobody else has templated.
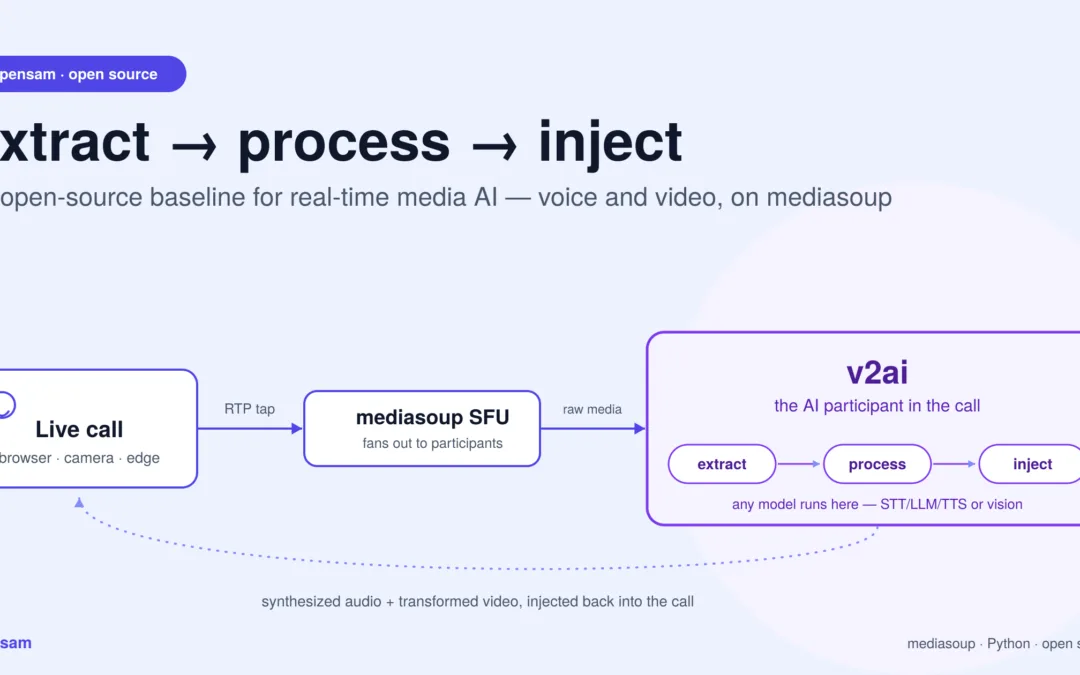
Extract, process, inject — the whole idea in one picture. opensam solves the hard, undifferentiated plumbing — pulling raw media off a live call and pushing results back in. What model runs in the middle is your product.
This is the first of two posts. Here we look at what opensam lets you build and why owning this baseline matters. A follow-up will go deep on the how — the RTP plumbing, codec handling, and pipeline internals.
What is opensam, in one paragraph?
opensam is a dependency-light, open-source baseline for real-time media AI — the plumbing that pulls raw audio and video off a live call, hands it to any AI model in plain Python, and pushes the result back in. Unlike audio-first frameworks such as Pipecat or LiveKit Agents, opensam treats video as a first-class citizen and exposes the transport layer directly, so you can build voice agents, vision pipelines, or both on the same foundation — on-prem if you need to.
TL;DR
Most real-time voice-AI frameworks hand you a fast on-ramp and a set of opinions. That’s a great trade when your product looks like the demo. It’s a frustrating one the moment you need something the framework never imagined — processing video frames, injecting transformed media back into a live call, running on-prem models for compliance, or wiring AI into a dashcam feed instead of a support call.
opensam takes the opposite stance. It’s a dependency-light, transport-level baseline that shows you the entire path — from a browser’s microphone and camera, through a media server, into a plain Python process where any AI model can run, and back out to participants. You own every layer. Nothing is hidden behind a framework abstraction.
That makes it ideal for one job in particular: standing up a credible real-time media AI proof of concept, fast, for a use case that doesn’t fit the standard voice-agent mold.
Why a baseline you own beats a real-time media AI framework you rent
Frameworks like Pipecat, LiveKit Agents, or Vapi are genuinely good. They compress weeks of glue code into an afternoon. But they come with structural assumptions:
They’re audio-first. The mental model is speech in → LLM → speech out. Video is, at best, a bolt-on. If your product is fundamentally about pixels — telematics, surveillance, avatars — you’re fighting the grain.
They own the loop. The pipeline runner, the interruption logic, the turn-taking — that’s the framework’s territory. When you need to change how a frame is scheduled or how media is muxed, you’re patching someone else’s engine.
They abstract the transport. You rarely touch the actual RTP. That’s convenient until you need to, and then there’s a wall between you and the bytes.
Provider and deployment opinions. Swapping a model, running fully on-prem for a regulated customer, or metering per-room cost often means working around the framework.
opensam inverts all four. It is not a framework you extend; it’s a reference implementation you read, fork, and reshape. The AI loop is a few hundred lines of plain asyncio you can see end to end. The media path is explicit. Every provider is swappable because nothing depends on a provider-specific base class. And the whole thing is small enough to fully understand in an afternoon — which is exactly what you want under a proof of concept you’ll have to defend to a customer.
The point isn’t “frameworks bad.” It’s that a baseline — a clean, minimal, fully-owned starting point — is a different and complementary tool. When the requirement is novel, you want to start from bedrock, not from someone else’s opinions.
The stack, functionally
opensam ships three composable layers. You can start at whichever one matches your latency, scale, and control needs.
Layer
What it is
When you reach for it
full-mesh
Pure peer-to-peer WebRTC calling (React + Node signalling + TURN).
Smallest footprint, 2–4 participants, no media server to run.
mediasoup
The same experience on a mediasoup SFU — clients upload once, the server fans out. Redis, Prometheus, Grafana included.
Larger rooms, scale, and — crucially — a server-side tap point for media.
v2ai
An AI participant that joins a mediasoup room, pulls raw audio and video off the wire, runs it through AI, and speaks/acts back.
Anywhere you want a model inside a live call.
The magic layer is v2ai, and the reason is a single architectural idea worth stating plainly.
The one pattern that makes real-time media AI general: extract → process → inject
Every real-time media AI product, no matter how exotic, is a variation on the same loop:
Extract raw media from a live stream.
Process it with a model.
Inject a result back — as audio, as an event, or as transformed media.
opensam implements this loop against a real media server rather than a toy file. On the extract side, the AI bot asks the SFU to copy a participant’s RTP to a plain transport, then receives:
Audio — Opus RTP, decoded to clean 16 kHz PCM, ready for any speech model.
Video — VP8 RTP, reassembled and decoded to raw frames, ready for any vision model.
On the process side, the repo demonstrates a full audio brain — voice-activity detection, speech-to-text, an LLM with tool use, and text-to-speech — plus a vision path that samples frames, encodes them, and sends them to a vision model.
On the inject side, it produces synthesized audio back into the live call as a normal participant would.
Here’s why that matters: once you can pull raw frames out and push media back in, you are no longer limited to “voice assistant.” Swap the model in the middle and the exact same skeleton becomes a driver-monitoring system, a security analyst, or a live video filter. The transport, the decode, the timing, the return path — the genuinely hard, undifferentiated plumbing of real-time media AI — is already solved and visible.
What’s in the toolbox
From a functional standpoint, a developer picking up opensam inherits:
Media transport, both topologies. Mesh for the simplest path; SFU for scale and a clean server-side media tap.
Raw media access. Decoded audio PCM and decoded video frames handed to you in Python — the thing frameworks hide and telematics/vision products desperately need.
A working audio brain. Wake-word gating, Silero VAD, streaming STT (Deepgram with a Whisper fallback), an LLM layer with streaming and tool calls, and multi-provider TTS (Cartesia / Deepgram / a local Kokoro backup). Barge-in / interruption is handled — the bot stops talking when a human starts.
A working vision path. Frame sampling (throttle the firehose to the rate your model can afford), JPEG encoding, and a vision layer that falls back across Claude and an on-prem LLaVA.
Media output. A proven path for putting AI-generated audio back into the room — the template you mirror for any “inject” step.
The unglamorous production-adjacent bits. Consent gating before any AI touches a participant’s video, PII scrubbing before text hits an LLM, OpenTelemetry tracing, Prometheus/Grafana dashboards, per-room cost tracking, and circuit breakers around flaky upstreams.
These are the things that make a proof of concept demoable to a real customer rather than a notebook. Everything is swappable because nothing is welded to a framework. Don’t want Deepgram? The STT boundary is one class. Need a local LLM for a data-residency clause? The LLM call is one function. That freedom is the whole point of a baseline.
Real-time media AI example use cases
The following illustrate how the same extract → process → inject loop retargets to very different products. They show where the repo already does the heavy lifting and where you’d plug in your own model.
1. Video telematics & driver safety
The idea: a camera in a vehicle (or a stream from an edge device) becomes a live feed that an AI watches continuously — flagging drowsiness, distraction, phone use, tailgating, or road hazards, and speaking warnings back to the driver in real time.
What opensam already gives you: the driver’s video arrives as decoded frames; the frame sampler throttles them to a sane rate (you don’t need 30 fps to catch a microsleep); the consent and cost machinery is in place; and the return path can speak an alert — “Eyes on the road” — through the same audio producer the meeting bot uses.
What you add: your detection model in the process step (a drowsiness/attention classifier instead of a slide summarizer). The event → voice-alert wiring is already the pattern; you’re changing what triggers the alert, not how it’s delivered.
2. Physical safety & security monitoring
The idea: a live camera feed — a site entrance, a factory floor, a retail aisle — is analyzed in real time for intrusion, missing PPE, weapons, loitering, or crowd density, raising events the moment something is seen rather than after the fact.
What opensam already gives you: continuous frame extraction from a live RTC stream, sampling to control model spend, a multi-provider vision path with an on-prem LLaVA fallback (critical when footage can’t leave the building), consent gating for privacy compliance, PII scrubbing for anything textual, and observability to prove the pipeline is alive.
What you add: the security-specific detection model and your alerting sink — a dashboard event, a webhook, an SMS. Because the vision boundary is explicit, running everything air-gapped on local models is a configuration choice, not a rewrite.
3. Face swap & live avatars in streaming
The idea: transform a participant’s video in real time — swap a face, apply a stylized avatar, blur a background, anonymize a whistleblower — and stream the modified video back into the call.
Why it’s the purest demonstration of the pattern: this is extract → transform → inject in its most literal form. opensam already implements the first two-thirds against real media: it pulls VP8 off the SFU and decodes it to raw frames you can hand to a face-swap or restyle model. The audio path then shows you exactly how to produce media back into mediasoup as a participant.
What you add: the transform model, plus the video-return leg — encoding processed frames and publishing them the way the repo already publishes audio. In other words, opensam hands you the ingestion, decode, and a working blueprint for the injection side; you supply the model and mirror the producer pattern for video.
That’s a real proof of concept on a foundation that would otherwise take weeks to build.
On latency: live face swap is the most demanding of the three — every frame is on the critical path, not sampled. The opensam baseline is where you prove the concept and the pipeline shape; hitting broadcast-grade frame budgets is a hardening exercise (see the disclaimer below).
What you’re expected to build on top
Being honest about the seams is part of what makes a real-time media AI baseline trustworthy:
The “inject transformed video” leg is a blueprint, not a finished feature. Audio-return is implemented; video-return you build by following the same producer pattern.
The AI models are examples, not the product. The value is the scaffolding around them. Your differentiation is the model you drop into the process step.
Robustness is proof-of-concept-grade. Packet reordering, jitter buffering, multi-speaker scaling, and tight frame-timing are deliberately simple so the code stays readable.
None of these are surprises once you see the shape of the code — and each is exactly the kind of thing you’d expect to own when you choose a baseline over a framework.
From proof of concept to production
Disclaimer.opensam is intended for proof-of-concept and educational use. It is a reference baseline for understanding and prototyping real-time media AI — deliberately minimal, readable, and un-opinionated. It is not hardened for production traffic: it does not, out of the box, guarantee the latency budgets, jitter resilience, multi-tenant scale, security posture, or reliability that live products require.
When a proof of concept earns the right to become a product, you don’t want to spend the next two quarters rebuilding the plumbing into something production-grade. That’s precisely the gap the Samvyo media stack fills: the same capabilities — real-time transport, raw media access, audio and vision AI pipelines, media injection — engineered for the latency, scale, resilience, and compliance that production demands. opensam lets you prove what to build and that it works; Samvyo is the credible path to shipping it.
Think of it as a deliberate two-step: prototype real-time media AI on the open baseline, productionize on the stack built for it.
Getting started
Everything lives on the development branch, each project in its own folder with a dedicated README:
git clone git@github.com:Samvyo/opensam.git
cd opensam
git checkout development
Start with full-mesh to see real-time media with the least ceremony.
Move to mediasoup when you need scale and a server-side media tap.
Open v2ai to watch an AI join a live call, see the world, and speak back — then swap the model in the middle for whatever your product needs to see.
Fork it, read it, break it, and make it yours. That’s what a baseline is for.
Next post: a byte-level tour of how opensam extracts RTP audio and VP8 video from a mediasoup transport and runs it through the AI pipelines.
Frequently asked questions about real-time media AI and opensam
What is opensam?
opensam is an open-source, dependency-light baseline for real-time media AI. It extracts raw audio and video from a live call through a mediasoup media server, hands it to any AI model in plain Python, and injects the result back into the call — giving developers a transport layer they fully own instead of a framework abstraction.
How is opensam different from Pipecat or LiveKit Agents?
Pipecat and LiveKit Agents are audio-first frameworks that own the pipeline loop and abstract away the RTP transport. opensam is transport-level and treats video as a first-class citizen: it exposes the raw extract → process → inject loop directly, so developers can build both voice and video real-time media AI without fighting a framework built for speech-only use cases.
Can opensam process live video, not just audio?
Yes. opensam decodes VP8 RTP from the SFU into raw video frames in Python, samples them at a configurable rate, and feeds them to any vision model — the same pattern it uses for audio. This makes it suited to video-first real-time media AI use cases like driver monitoring, security analytics, and live face swap.
What media server does opensam use?
opensam runs on mediasoup, an open-source SFU (Selective Forwarding Unit). Clients upload media once, the SFU fans it out to participants, and an AI bot can tap a participant’s RTP stream server-side — the mechanism that makes real-time media AI possible without a browser-side plugin.
Is opensam production-ready?
No. opensam is explicitly a proof-of-concept and educational baseline. It does not guarantee production latency budgets, jitter resilience, multi-tenant scale, or security hardening out of the box. Teams that need to productionize a real-time media AI pilot typically move from opensam to a hardened stack like Samvyo, which implements the same extract-process-inject pattern with production-grade reliability.
What AI providers does opensam support by default?
The reference implementation wires up Deepgram (with a Whisper fallback) for speech-to-text, Cartesia, Deepgram, and a local Kokoro backup for text-to-speech, an LLM layer with streaming and tool calls, and a vision path that falls back across Claude and an on-prem LLaVA model. Every provider boundary is a single swappable class.
What can I build with opensam besides a voice assistant?
Because opensam exposes raw decoded audio and video rather than hiding it behind a voice-agent abstraction, the same extract → process → inject skeleton supports driver-safety telematics, physical security and PPE monitoring, live face swap and avatar streaming, and any other real-time media AI product built around a live camera or microphone feed.
Does opensam support on-premise or air-gapped deployment?
Yes — this is one of its core design goals. Because no component is welded to a specific provider’s base class, swapping a cloud STT, LLM, or vision model for a local equivalent (e.g., on-prem LLaVA) is a configuration change, not a rewrite, which matters for regulated industries and any environment where footage or audio cannot leave the building.
How do I get started with opensam?
Clone the repository (git clone git@github.com:Samvyo/opensam.git), check out the development branch, and work through the three layers in order: full-mesh for the simplest peer-to-peer demo, mediasoup for an SFU with a server-side media tap, then v2ai to see an AI bot join a live call and process real-time media AI end to end.
Who built opensam and why?
opensam is an open-source project from the team behind Samvyo, an enterprise real-time communications platform. opensam exists so developers can prototype novel real-time media AI use cases on a baseline they fully understand, before deciding whether to productionize on a hardened stack.
Before your next vendor discussion, here’s the mental model you actually need.
RTMP vs SRT vs WebRTC — If you’ve recently found yourself in a conversation about low-latency video infrastructure, you’ve almost certainly encountered all three: RTMP, SRT, and WebRTC. Each has passionate advocates. Each has legitimate use cases. And each is routinely misapplied — often by the very vendors pitching them.
This piece won’t give you another latency comparison table. What it will give you is a decision framework: a way of thinking about your pipeline in legs, asking the right questions at each leg, and arriving at an architecture that uses the right protocol for the right job — even if that means using all three simultaneously.
The Core Mental Model: Think in Pipeline Legs, Not Protocols
The most common mistake in streaming architecture decisions is choosing a single protocol and applying it everywhere. Real-world systems almost never work this way.
A live video pipeline has at minimum three distinct legs:
Each leg has different latency requirements, scale characteristics, network conditions, and endpoint types. A protocol that’s optimal for the ingest leg may be catastrophic for viewer distribution. The right question is never “Which protocol should we use?” — it’s “Which protocol is right for which leg of this pipeline?”
With that model in mind, let’s look at each protocol with the precision a real architectural decision requires.
RTMP: The Universal Workhorse (That’s Showing Its Age)
What it is: Real-Time Messaging Protocol was developed by Macromedia in the early 2000s for Flash-based streaming. Adobe later opened the specification. Despite Flash being long dead, RTMP remains the dominant ingest protocol for live streaming infrastructure globally.
Transport: TCP. This is the defining characteristic that explains most of RTMP’s tradeoffs.
Typical latency: 3–8 seconds, and it accumulates. Unlike UDP-based protocols, TCP’s retransmission behavior means that packet loss on a congested network causes head-of-line blocking — the entire stream waits for the dropped packet to be retransmitted before continuing. Over a multi-hour stream, this can compound into significant drift.
Where RTMP genuinely excels:
Compatibility. OBS, Wirecast, hardware encoders, and virtually every streaming platform (YouTube Live, Twitch, Facebook Live) speak RTMP for ingest. When you need to accept streams from diverse, unpredictable sources, RTMP is the lowest-friction path.
CDN and media server support. Wowza, Nginx-RTMP, AWS Elemental, and most CDNs have decades of hardened RTMP support. If your distribution infrastructure is already built on RTMP, staying on it for ingest reduces architectural surface area.
Simplicity at the encoder side. For a broadcaster using OBS, setting up an RTMP stream is a single URL and stream key. Nothing else to configure.
Where RTMP fails:
Any use case where latency below 3 seconds matters.
Environments with unreliable network conditions (the TCP retransmission behavior makes it worse on lossy networks, not better).
Browser-native ingest or delivery — RTMP requires a plugin or native application. There is no browser RTMP.
The verdict: Among RTMP vs SRT vs WebRTC, RTMP is the right choice when compatibility and ecosystem coverage outweigh latency requirements. It is not suitable as the primary transport for any real-time interactive application.
SRT: The Broadcast Engineer’s Answer to an Unreliable World
What it is: Secure Reliable Transport was developed by Haivision and open-sourced in 2017. It was designed specifically to solve one problem: how do you get broadcast-quality, low-latency video across the public internet reliably?
Transport: UDP, with a reliability layer (ARQ — Automatic Repeat reQuest) built on top, plus built-in AES-128/256 encryption.
Typical latency: 0.5–2 seconds. SRT uses a configurable latency buffer; you trade latency for reliability by adjusting this buffer based on your expected network conditions. On a controlled, low-jitter network, you can push SRT latency toward 200–300ms. On a congested public internet path, you’ll want a larger buffer.
Where SRT genuinely excels:
Contribution feeds over unpredictable networks. Field reporters, remote venues, OB trucks — SRT was designed for exactly this. It recovers from packet loss gracefully without the TCP head-of-line blocking problem.
Cross-datacenter transport. Moving video between data centers across the public internet, SRT is significantly more reliable than RTMP and meaningfully lower latency.
Broadcast-grade workflows. Major broadcasters (BBC, Fox Sports, others) have adopted SRT for contribution because it behaves predictably under network stress.
Security. Unlike base RTMP, SRT encrypts the stream by default.
Protocol-level latency control. SRT gives you explicit knobs for latency vs. reliability tradeoffs. RTMP gives you none.
Where SRT falls short:
Not browser-native. Like RTMP, SRT requires native application support. No browser can originate or receive an SRT stream natively.
Not universally supported. While adoption is growing fast, SRT support in CDN edges and ingest points is still less universal than RTMP.
Still not low enough for interactive applications. 500ms is a meaningful improvement over RTMP, but it’s still above the threshold for true interactive video. You can hear 500ms delay in a conversation. You can feel it in a live response system.
The verdict: Among RTMP vs SRT vs WebRTC, SRT is the right choice for the contribution leg — moving video from a source to a media server across a network you don’t fully control, where reliability matters as much as latency. It’s a significant upgrade from RTMP for that specific job. It is not a replacement for WebRTC in interactive or ultra-low-latency scenarios.
WebRTC: The Interactive Web’s Real-Time Foundation
What it is: Web Real-Time Communication is a W3C/IETF open standard developed primarily by Google and now implemented natively in all major browsers. It was built from the ground up for peer-to-peer and server-mediated real-time communication.
Transport: UDP via DTLS-SRTP. Encryption is mandatory — there is no unencrypted WebRTC. The protocol stack also includes STUN/TURN/ICE for NAT traversal and congestion control algorithms (GCC, REMB) for adaptive bitrate.
Typical latency: 50–200ms. This is a qualitatively different class of latency from RTMP or SRT. Sub-200ms means real-time human perception: a performer can react to viewer input, a system can detect stream failure and switch states before a viewer notices.
Where WebRTC genuinely excels:
Browser-native ingest and delivery. A performer can stream directly from a browser tab. A viewer can receive a stream in a browser tab. No application install, no plugin, no external dependency.
Interactive applications. Video conferencing, live auctions, real-time coaching, interactive performances — anything where participants need to respond to each other in real time.
Adaptive bitrate by default. WebRTC’s congestion control automatically adjusts encoding based on network conditions, without requiring manual configuration.
Safety-critical routing. Because WebRTC sessions are server-mediated through an SFU (Selective Forwarding Unit), the server controls precisely what each participant receives. This is critical for use cases where certain streams must never be exposed to certain viewers — that enforcement lives at the media routing layer, not the application layer.
OBS integration via WHIP. From OBS Studio v30 onwards, WebRTC ingest via the WHIP (WebRTC HTTP Ingest Protocol) standard is natively supported. This removes one of the last remaining barriers to WebRTC adoption in production streaming workflows.
Where WebRTC falls short:
Scale requires an SFU. Pure WebRTC peer-to-peer breaks down beyond a handful of participants. Production WebRTC at scale requires a properly architected SFU layer — which adds infrastructure complexity.
CDN delivery is not native. WebRTC isn’t natively supported by CDN edges the way HLS is. For large-audience broadcast delivery (thousands to millions of viewers), WebRTC needs to be combined with HLS/DASH at the egress leg.
Not universally supported by hardware encoders. Professional broadcast hardware often speaks RTMP or SRT but not WebRTC. In workflows where hardware encoders are the source, RTMP or SRT ingest may be unavoidable.
The verdict: Among RTMP vs SRT vs WebRTC, WebRTC is the right choice whenever sub-300ms latency is required, whenever browser-native participation matters, or whenever you need fine-grained server-side control over who receives what stream. It is the modern foundation for interactive live video.
RTMP vs SRT vs WebRTC: The Comparison at a Glance
Dimension
RTMP
SRT
WebRTC
Latency
3–8s (accumulates)
0.5–2s
50–200ms
Transport
TCP
UDP + ARQ
UDP + DTLS
Encryption
Optional (RTMPS)
Built-in AES
Mandatory
Browser native
No
No
Yes
Adaptive bitrate
No
Limited
Yes (built-in)
Reliability on lossy networks
Poor
Excellent
Good
CDN/ecosystem support
Excellent
Growing
Limited
Scale model
Push to server
Push to server
SFU-mediated
OBS support
Native
Native
Native (v30+, WHIP)
Suitable for interactive
No
No
Yes
Suitable for broadcast scale
Yes
Yes
With HLS egress
The Decision Framework: Questions to Ask at Each Pipeline Leg
Rather than picking a protocol, run through these questions for each leg of your pipeline:
Leg 1: Source → Ingest Server
Question 1: Does the source require real-time interaction or feedback?
Yes → WebRTC (only protocol with sub-300ms latency at this leg)
No → proceed to Question 2
Question 2: How controlled is the network between source and ingest?
Unreliable / public internet / variable → SRT (reliability layer handles packet loss)
Controlled / datacenter / low jitter → RTMP or SRT (both work; SRT preferred for its lower latency and encryption)
Question 3: What software or hardware is the source using?
OBS v30+, browser → WebRTC (WHIP) is viable
Hardware encoder, legacy OBS, third-party streaming software → RTMP or SRT depending on support
Leg 2: Media Server → Processing Layer
Question 4: Does the processing layer need real-time responsiveness to stream state?
Yes (e.g., AI video processing, failure detection, frame-level operations) → RTP (raw transport from a WebRTC SFU, or GStreamer pipeline with SRT)
No (e.g., recording, async processing) → RTMP or SRT are both fine
Question 5: How quickly must failure conditions be detected and handled?
Sub-second → WebRTC/SFU-based routing (can enforce viewer-facing states at the routing layer in real time)
Seconds are acceptable → SRT or RTMP with application-level monitoring
Leg 3: Media Server → Viewer
Question 6: How many concurrent viewers?
Hundreds or fewer, interactive → WebRTC direct delivery
Thousands+ → HLS/DASH from a transcoding layer, potentially after WebRTC ingest and SFU processing
Question 7: Do viewers need to interact with the stream (react, participate)?
Yes → WebRTC delivery
No (passive viewing) → HLS/DASH is more cost-effective at scale
Why: WebRTC at ingest gives sub-200ms, enabling the AI processing layer to stay within a real-time latency budget. The SFU enforces the critical safety requirement: raw performer video never reaches the viewer — only the processed output does. SRT or RTMP at the ingest leg would add 500ms–8s before the frame even reaches the GPU, making true real-time processing impossible.
The Hybrid Principle: Most Production Systems Use All Three
The practical conclusion from this framework is that most mature real-world systems use multiple protocols at different legs. A common production-grade architecture might use:
RTMP for accepting ingest from legacy hardware encoders and third-party broadcasters who won’t change their setup
SRT for contribution feeds from field locations over unreliable networks
WebRTC for performer ingest and interactive viewer delivery where latency matters
HLS for passive large-audience delivery from a CDN
The protocols are not competitors. They are tools with different jobs. A mature infrastructure team reaches for the right one at each stage of the pipeline — and designs the system so that each leg can be upgraded independently as requirements evolve.
Before Your Next Vendor Discussion: The Checklist
Go into vendor conversations with these questions answered for your specific architecture:
What are the latency requirements at each leg? (Interactive vs. near-real-time vs. broadcast-acceptable)
What are the source endpoints? (Browser, OBS, hardware encoder, IP camera)
What network conditions govern each leg? (Controlled datacenter vs. public internet last mile)
What is the peak viewer scale? (Hundreds vs. thousands vs. millions)
Does any leg require server-side control over what viewers receive? (Safety routing, access control, failure states)
What processing happens between ingest and egress? (AI inference, transcoding, recording)
What does the failure handling model look like? (How fast must failure be detected? What do viewers see?)
A vendor who cannot answer these questions in terms of your specific pipeline legs — rather than pitching a single protocol as the universal answer — is not yet thinking at the depth your architecture requires.
Conclusion
The question is never “RTMP vs SRT vs WebRTC?” The question is always “which protocol, at which leg of this pipeline, for which set of constraints?”
RTMP earns its place in compatibility-first ingest scenarios and established CDN workflows. SRT earns its place in contribution feeds across unreliable networks where reliability and modest latency matter. WebRTC earns its place wherever interactivity, browser-native access, server-side routing control, or sub-200ms latency is required.
Real-time AI video processing — including applications like live video filtering, avatar replacement, and face processing — represents a use case where WebRTC at the ingest leg is increasingly not just the best option but the necessary one. The latency budget demanded by real-time AI inference leaves no room for the seconds that RTMP accumulates or the half-second buffer that SRT requires.
Build your architecture in legs. Choose deliberately at each one. And be appropriately skeptical of any vendor who offers you a single-protocol answer to a multi-leg problem.
CentEdge builds real-time communications infrastructure for enterprises in regulated industries. Samvyo is an AI-native WebRTC platform built on a scalable SFU architecture, designed for low-latency media ingest, session control, and adaptive egress.
The getUserMedia() API in WebRTC is primarily responsible capturing the media streams currently available. The WebRTC standard provides this API for accessing cameras and microphones connected to the computer or smartphone. These devices are commonly referred to as Media Devices and can be accessed with JavaScript through the navigator.mediaDevices object, which implements the MediaDevices interface. From this object we can enumerate all connected devices, listen for device changes (when a device is connected or disconnected), and open a device to retrieve a Media Stream.
The most common way this is used is through the function getUserMedia(), which returns a promise that will resolve to a MediaStream for the matching media devices. This function takes a single MediaStreamConstraints object that specifies the requirements that we have. For instance, to simply open the default microphone and camera, we would do the following.
The call to getUserMedia() will trigger a permissions request. If the user accepts the permission, the promise is resolved with a MediaStream containing one video and one audio track. If the permission is denied, a Permission Denied Error is thrown. In case there are no matching devices connected, a Not Found Error will be thrown.
Media Constraints
As one can see on the above snippet, one has to pass the media constraints while calling the getUserMedia API to access the video and audio streams( camera and mic) available to the browser. The constraints object, which must implement the MediaStreamConstraints interface, that we pass as a parameter to getUserMedia() allows us to open a media device that matches a certain requirement. This requirement can be very loosely defined (audio and/or video), or very specific (minimum camera resolution or an exact device ID). It is recommended that applications that use the getUserMedia()API first check the existing devices and then specifies a constraint that matches the exact device using the deviceId constraint. Devices will also, if possible, be configured according to the constraints. We can enable echo cancellation on microphones or set a specific or minimum width, height and frame rate of the video from the camera.Below is a brief about how to use media constraints in an advanced way.
The full documentation for the MediaStreamConstraints interface can be found on the MDN web docs.
Playing the video locally
Once a media device has been opened and we have a MediaStream available, we can assign it to a video or audio element to play the stream locally. The HTML needed for a typical video element used with getUserMedia() will usually have the attributes autoplay and playsinline. The autoplay attribute will cause new streams assigned to the element to play automatically. The playsinline attribute allows video to play inline, instead of only in full screen, on certain mobile browsers. It is also recommended to use controls=”false” for live streams, unless the user should be able to pause them.
This post briefly describes how to use the getUserMedia API currently available in all modern browsers. To explore this API further for understanding how it can be used with advanced settings and configurations needed for creating a production grade video conferencing applications, refer to this blog post.
If you are planning to build a simple P2P(peer to peer) video conferencing application, then check this blog post also to understand another important RTCPeerConnection API. One should be able to build a p2p video conferencing app using these 2 important APIs.
if you have any questions related getUserMedia / WebRTC as a whole, you can ask all your questions to get prompt answers in this dedicated WebRTC forum.
if you want to learn WebRTC to build a sound understanding of it along with all the technology in it’s protocol stack like ICE, STUN,TURN, DTLS, SRTP, SCTP etc., then check out our live online/onsite instructor led WebRTC training programs here. If you wish to register for one of our upcoming training programs, then you can do so using the registration form link provided there.
Here is an example public github repo for creating a simple p2p video conferencing app build using these 2 API with Nodejs as signalling server. Feel free to download the example and play around to understand the basics of WebRTC.
If you want to build some serious production grade video conferencing applications, then check out this open source github repo for a production grade WebRTC signalling server built using NodeJs which you can use to build and deploy your video calling app to any cloud. If your need is not fulfilled by this repo, feel free to visit our services page to know more about services.
If you want a custom video application without having to go through the pain of building it, then check out our products page to know more about our scalable, customizable and fully managed video conferencing / live streaming application as a service along with custom branding.
Feel free to reach out to us at hello@centedge.io for any kind of help and support need with WebRTC.